Label makers transform chaos into calm with just a few clicks. These handhle devices help you create custom labels that make everything easier to find and put away. Whether you’re tackling kitchen cabinets, craft rooms, or closets, a label maker turns everyday spaces into organized zones that actually stay tidy. The best part? You don’t need design skills or expensive supplies—just your label maker and a few minutes. Get ready to discover smart ways to use this simple tool throughout your home, from pantry shelves to charging cables.
Label Your Spice Jars for Quick Cooking
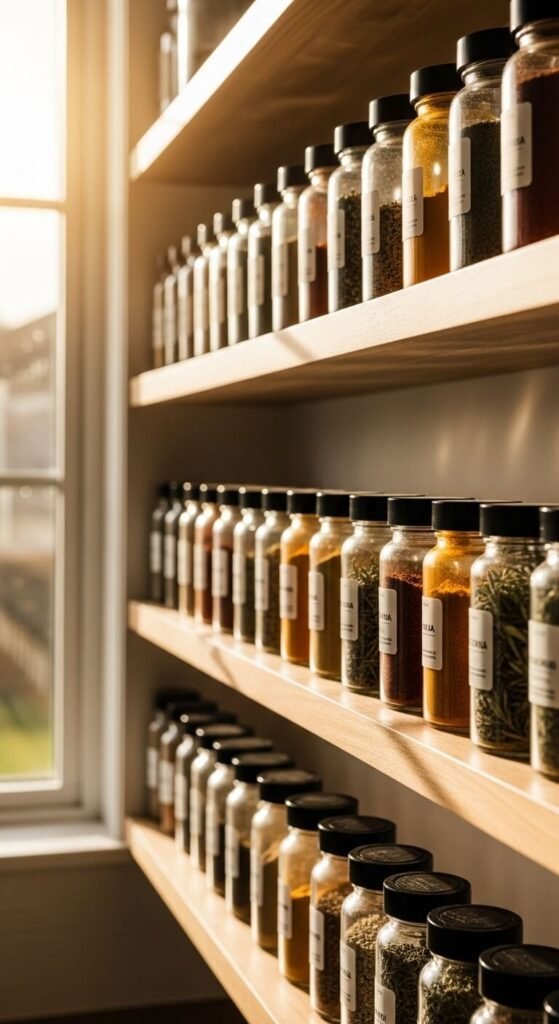
Match your spice jars with uniform labels so you can grab what you need while cooking.
Transfer spices into matching containers from the dollar store. Print labels with the spice name in clear letters. Stick them on the jar lids or fronts—whichever you see first when reaching in your cabinet.
This works great for frequently used spices like garlic powder, paprika, and cumin. You’ll stop squinting at tiny print on store bottles.
Place similar spices together, like all the Italian seasonings in one section. Takes about 20 minutes to label a full collection.
Create Cable and Cord Tags
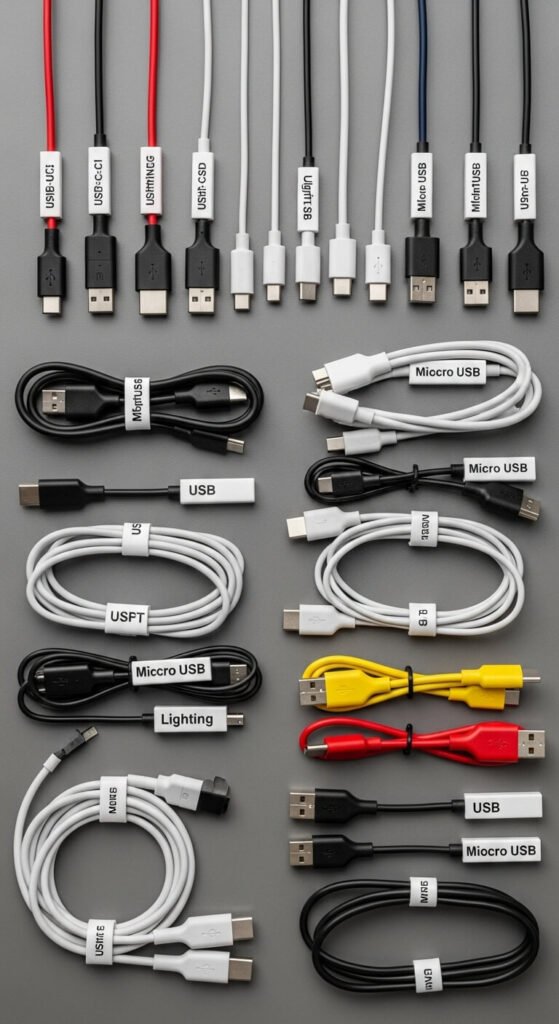
Stop untangling mystery cords by labeling each one near the plug.
Use small labels to mark phone chargers, laptop cables, and gaming cords. Write what device each cable powers. Wrap the label around the cord or stick it flat on the plug.
Check behind your TV stand or desk—this is where cable chaos lives. Label everything back there too.
Buy adhesive cable clips at any hardware store for under five dollars. They keep labeled cords separated and easy to grab. You’ll never pull the wrong charger again when rushing out the door.
Organize Freezer Meals by Date

Track what’s in your freezer with dated labels on every container.
Write the meal name and freeze date on each label. Stick it right on the lid before freezing. Use a format like “Chicken Soup – Jan 15” so you know what’s oldest.
This prevents mystery meals and food waste. Most frozen meals stay good for three months.
Dollar store containers work perfectly for batch cooking. Label them all at once during meal prep Sunday. Stack labeled containers with dates facing out so you can scan quickly without moving everything around.
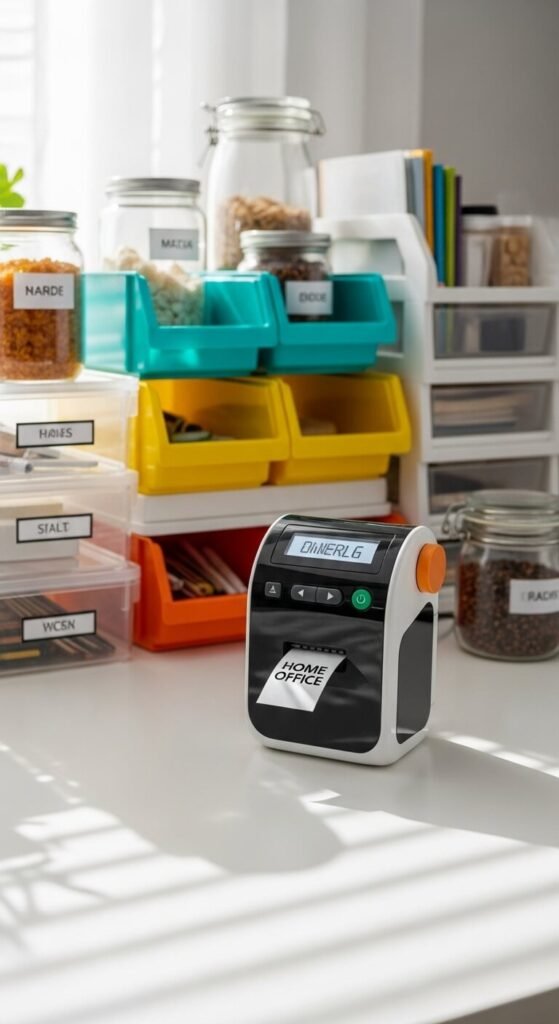
Tag Home Office Supplies

Give every drawer section a label so supplies always return to the right spot.
Use drawer dividers or small boxes to separate items. Label each section: “Pens,” “Clips,” “Sticky Notes,” “Stamps.”
This takes five minutes but saves hours of searching later. Even kids can put supplies back correctly when everything’s labeled.
Try labeling the outside of desk drawers too. Quick reference stickers help when you’re digging for batteries or chargers. Cardboard boxes from shipping orders make free drawer dividers—just cut them to size and label the top edge.
Identify Cleaning Product Spray Bottles
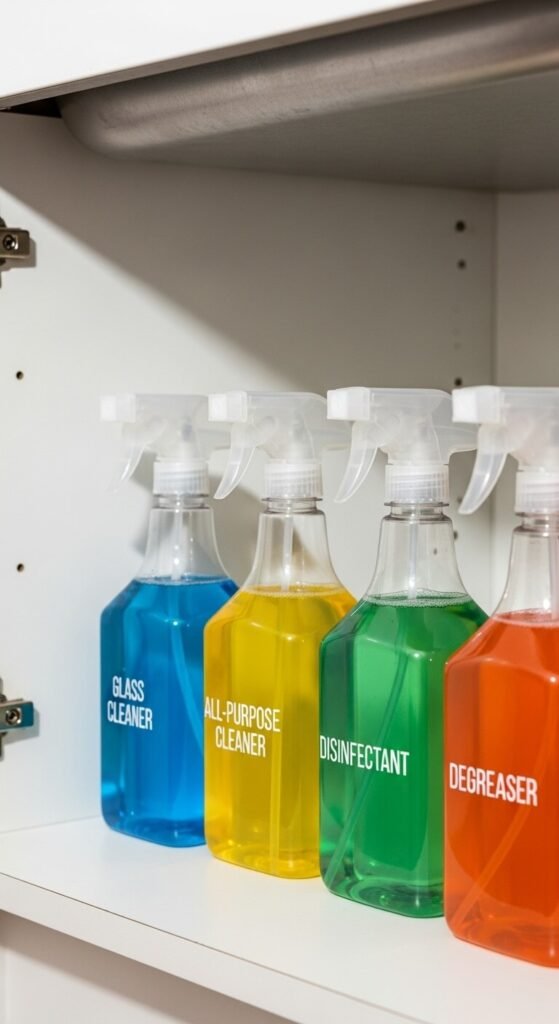
Refill spray bottles safely by labeling each one with its contents.
Mix your own cleaners or buy concentrates to save money. Pour them into reusable bottles and label immediately: “Glass Cleaner,” “All-Purpose,” “Bathroom Spray.”
Never guess what’s in an unmarked bottle again. This prevents mixing chemicals by accident.
Add mixing ratios to your labels if you dilute concentrates. Something like “1:10 vinegar” helps you refill correctly. Color-code bottles by room—blue for bathrooms, green for kitchen. Dollar store spray bottles cost about a dollar each and last for years.
Sort Craft Supplies by Type
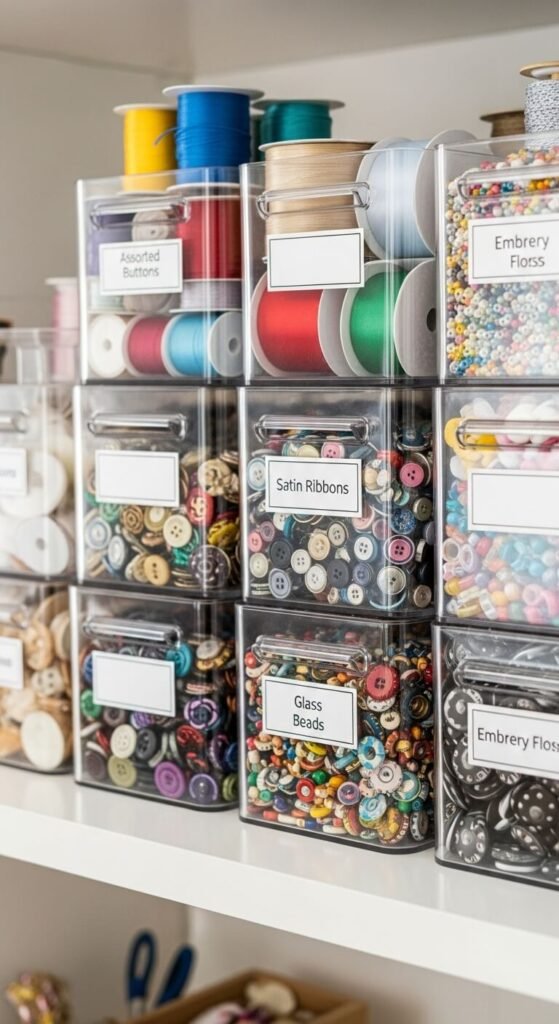
Find craft materials fast when every bin has a clear label.
Group similar items together: buttons in one container, ribbons in another, beads in a third. Label the outside so you see contents without opening every box.
Clear containers from discount stores work best because you can see inside too. Stack them on shelves with labels facing forward.
This system grows with your hobby. Add new labeled bins as your collection expands. Small containers work better than one giant box where everything mixes together. Spend about ten dollars on starter bins and labels.
Mark School Supply Stations
Help kids find homework supplies independently with labeled baskets.
Set up different stations: one for writing tools, one for art supplies, one for paper. Label each basket clearly at kid eye-level.
This teaches organization skills and reduces “where is my glue stick” questions. Use picture labels for younger children who can’t read yet.
Stackable plastic baskets cost about three dollars each at discount stores. Place them on a low shelf or desk. Refresh labels at the start of each school year when adding new supplies.
Label Bathroom Medicine Cabinet
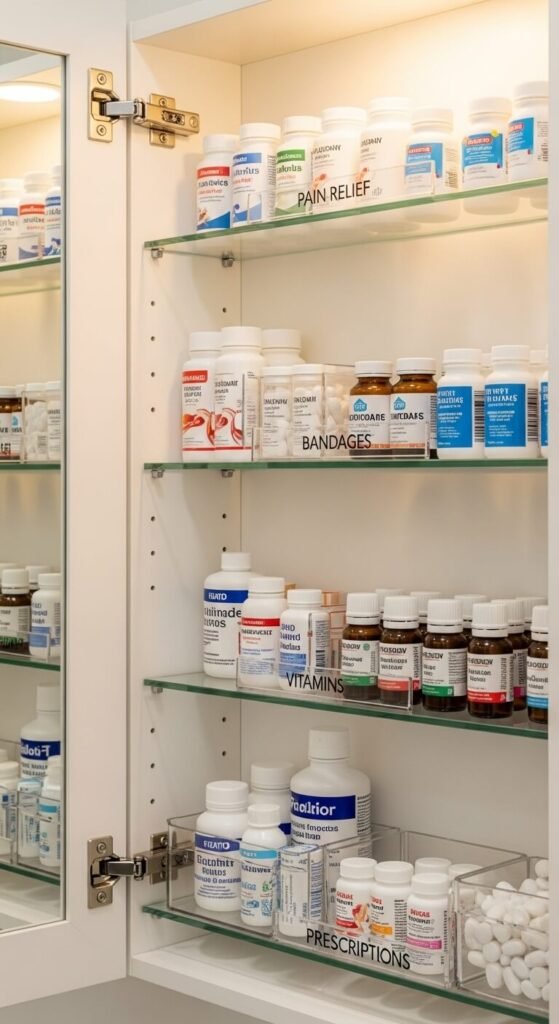
Create pharmacy-style organization in your medicine cabinet with category labels.
Group items by purpose: “First Aid,” “Vitamins,” “Pain Relief,” “Allergy.” Label each shelf or small container holding these categories.
Check expiration dates while you’re organizing. Toss anything outdated.
This setup helps during sick days when you’re searching for cold medicine. Clear acrylic shelf risers from home stores (about eight dollars) double your cabinet space. Label both the riser and the main shelf. Everyone in the house can find what they need without asking.
Organize Pantry Zones
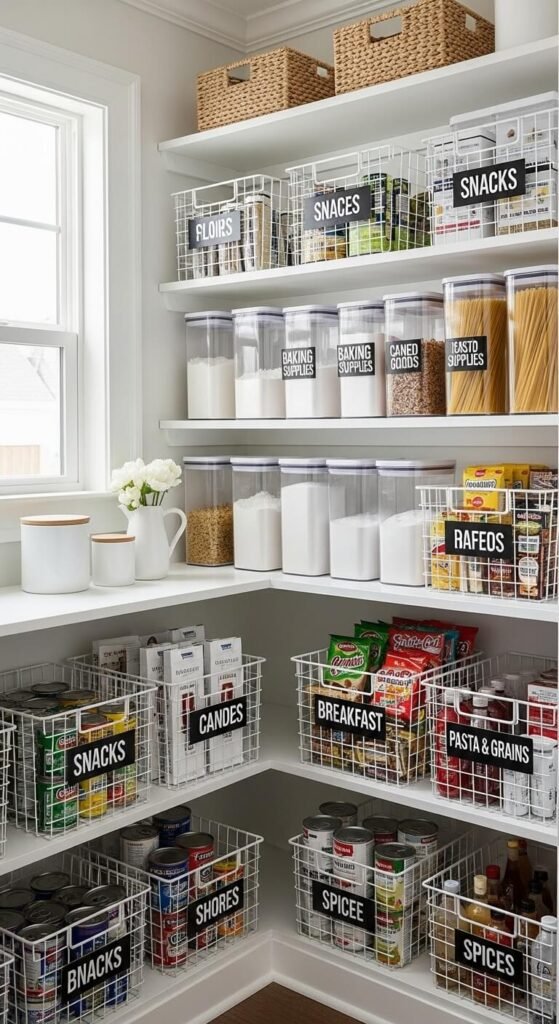
Divide your pantry into labeled zones so groceries have assigned homes.
Create areas like “Breakfast,” “Snacks,” “Baking,” “Canned Goods.” Label each shelf or basket with its category.
Put things back in the right zone after shopping. This system shows at a glance when you’re running low on something.
Wire baskets from discount stores (three for ten dollars) corral loose items. Label the basket fronts. Deep pantries work better with pull-out baskets you can label on the handle. Your family will actually maintain organization when zones are clearly marked.
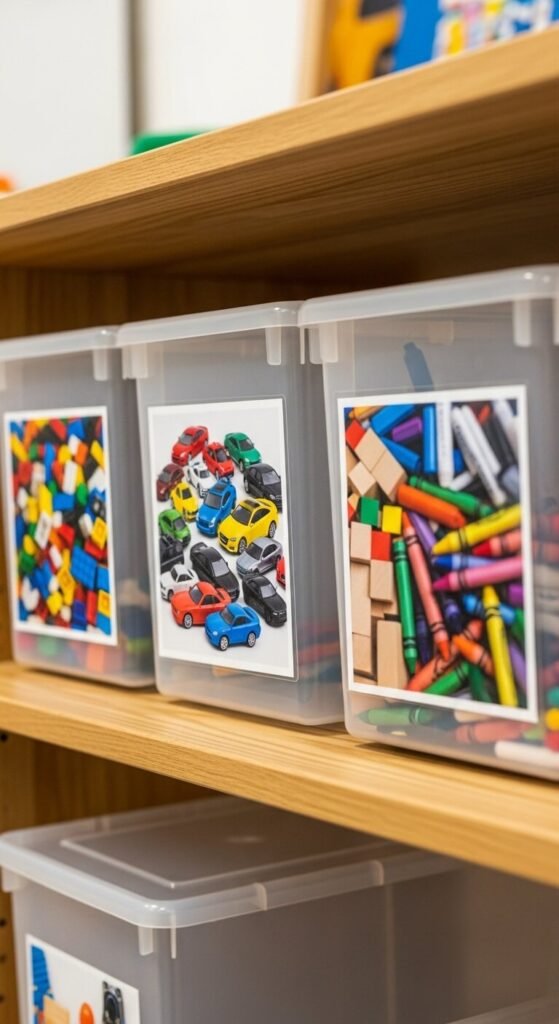
Tag Toy Storage Bins
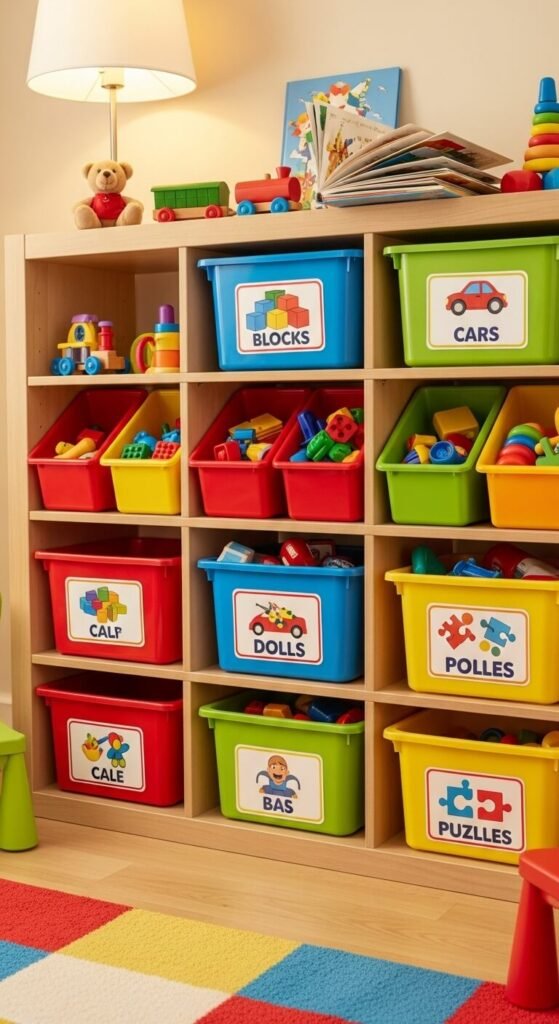
End toy cleanup battles with picture-and-word labels on every bin.
Take photos of what goes in each container. Print small pictures and add words beneath. Laminate labels so they survive sticky fingers.
Even toddlers can match toys to their picture when cleaning up. This builds reading skills too.
Use any bins you already own. The labels matter more than matching containers. Fabric storage cubes (five dollars each) fold flat when kids outgrow certain toys. Update labels as interests change. Clean-up time drops from 30 minutes to 10.
Identify Food Storage Containers
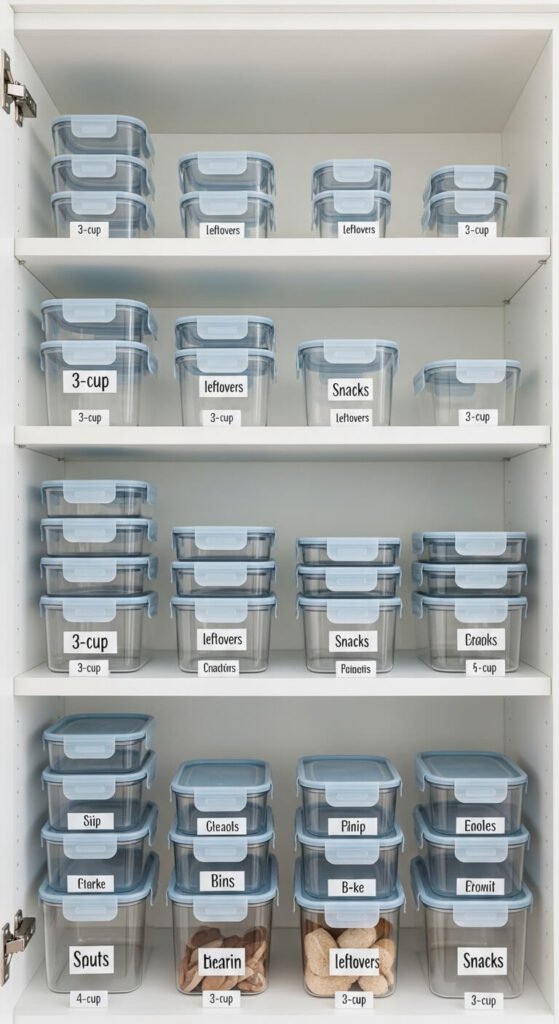
Stop the container-lid matching game by labeling sizes and purposes.
Mark containers by volume: “2 Cup,” “4 Cup,” “8 Cup.” Or label by use: “Lunch Leftovers,” “Meal Prep,” “Snacks.”
Stack same sizes together with labels facing out. Store lids in a separate labeled bin.
This simple system saves so much time when packing lunches or storing dinner leftovers. You’ll grab the right size on the first try. Dollar store containers work fine—you’re adding your own organization system anyway. Replace worn containers gradually while keeping the labeling system.
Create a Charging Station
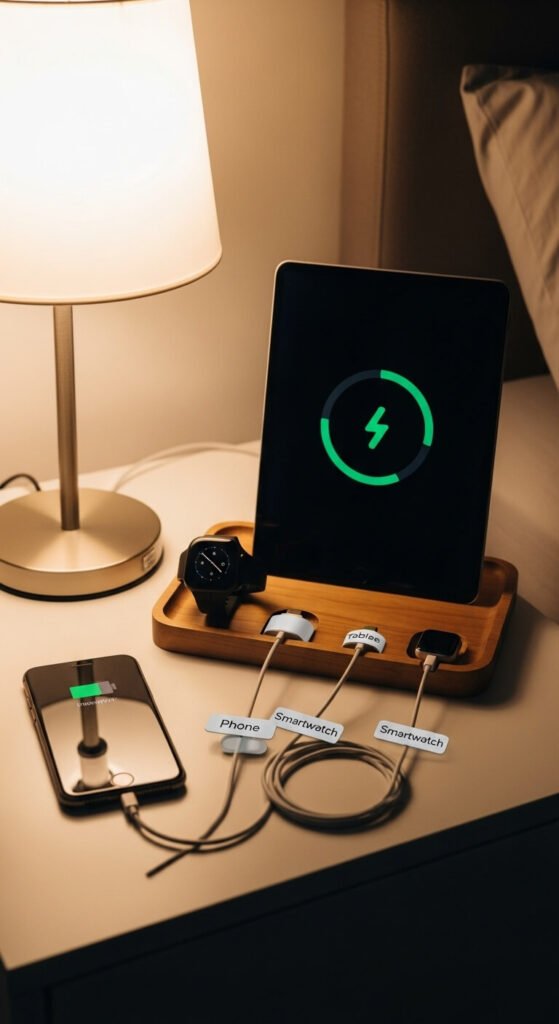
Build a family charging hub with labeled spots for each device.
Set up a basket or tray as your charging station. Label each cord that plugs in: “Dad’s Phone,” “Mom’s Tablet,” “Laptop.”
This prevents cord stealing and “whose charger is this” confusion. Everyone knows exactly where their cable lives.
Add a power strip with six outlets (about twelve dollars). Label outlets if multiple people share the station. Velcro cable ties (five dollars for a pack) keep cords tidy between uses. Place the station somewhere everyone passes daily, like the kitchen counter or entryway table.
Sort Seasonal Decorations
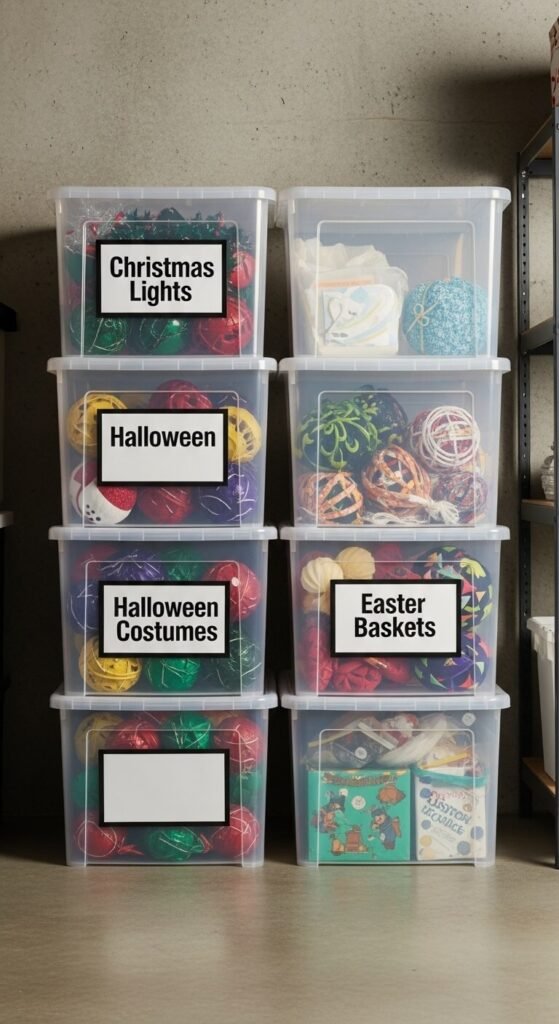
Label holiday bins by season so you find decorations without opening everything.
Use one bin per holiday or season. Label clearly: “Christmas Lights,” “Halloween,” “Spring Decor,” “Birthday Party.”
Add a contents list to each bin’s lid using a label. Write major items inside so you know which box has the tree skirt versus the ornaments.
Store bins on high shelves since you only access them seasonally. Clear bins cost about eight dollars each at home stores. Stack them with labels facing forward. Takes 20 minutes to label your whole collection but saves hours every holiday season.
Label Linen Closet Shelves
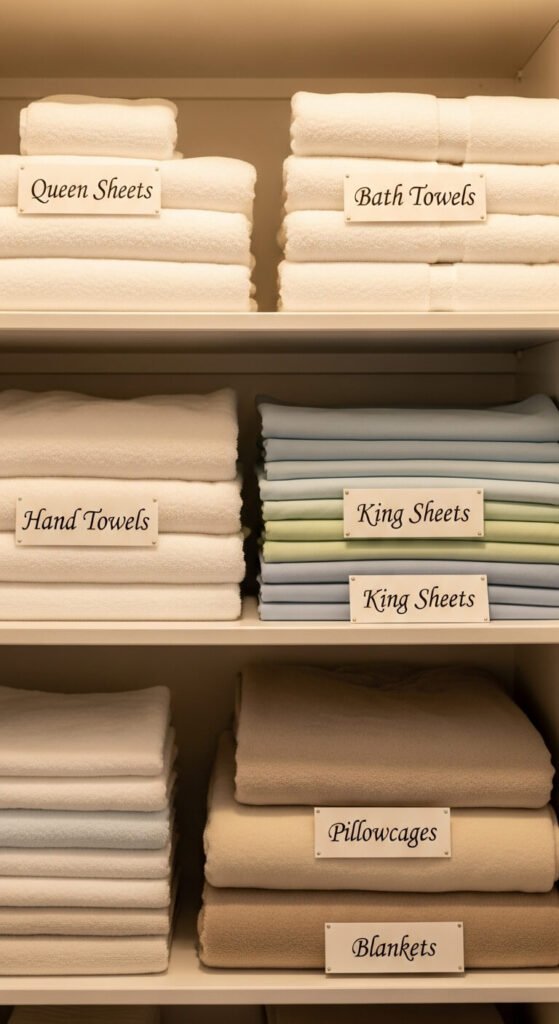
Match sheets to beds easily when every shelf has a size label.
Separate linens by type and size: “Queen Sheets,” “Twin Sheets,” “Bath Towels,” “Hand Towels.” Label each shelf.
Fold sheet sets inside one pillowcase from the set. Stack them on the correct labeled shelf.
This stops you from unfolding three sets to find the twin sheets. Color-code by bedroom if you want to get fancy—blue labels for kids’ rooms, gray for master. Shelf dividers (six dollars) keep stacks from toppling. Everyone can help with laundry when shelves clearly show where things belong.
Organize Kids’ Clothes Drawers
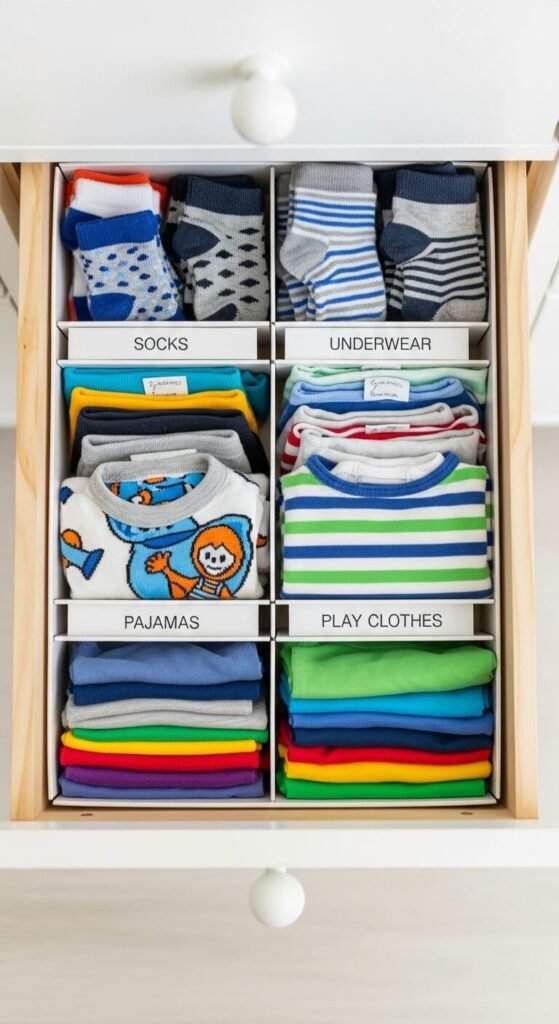
Teach kids independence by labeling their dresser drawers.
Put labels on drawer fronts showing what goes inside: “School Clothes,” “Play Clothes,” “Pajamas,” “Socks.”
Young kids benefit from picture labels alongside words. Take photos of each clothing type and add them to labels.
This helps during morning rushes when kids dress themselves. Cardboard box dividers work free for separating items inside drawers. They can cut old shipping boxes to size and label each section. Mornings get smoother when everyone knows the sock drawer from the shirt drawer.
Tag Garage Tool Storage
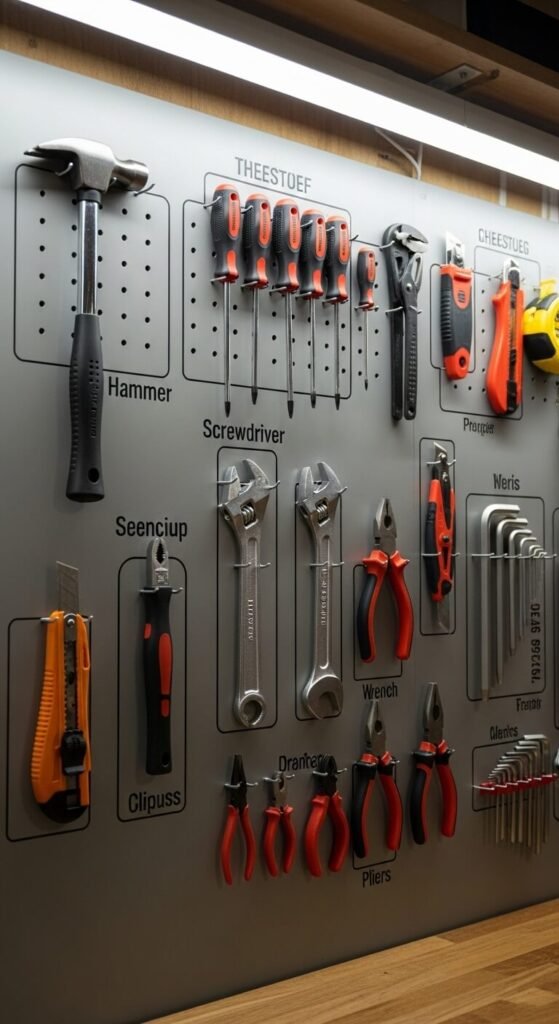
Create a tool shadow board system with labels under each spot.
Trace your tools on pegboard and label beneath each outline. Or simply label hooks: “Hammer,” “Screwdrivers,” “Wrenches.”
Tools return to the right spot every time. You’ll notice immediately when something’s missing.
Pegboard costs about 15 dollars per sheet at hardware stores. Add hooks for two dollars per pack. This system works in sheds, garages, or basement workshops. Label your toolbox drawers the same way. No more digging through three drawers to find needle-nose pliers.
Mark Pet Food and Supply Bins
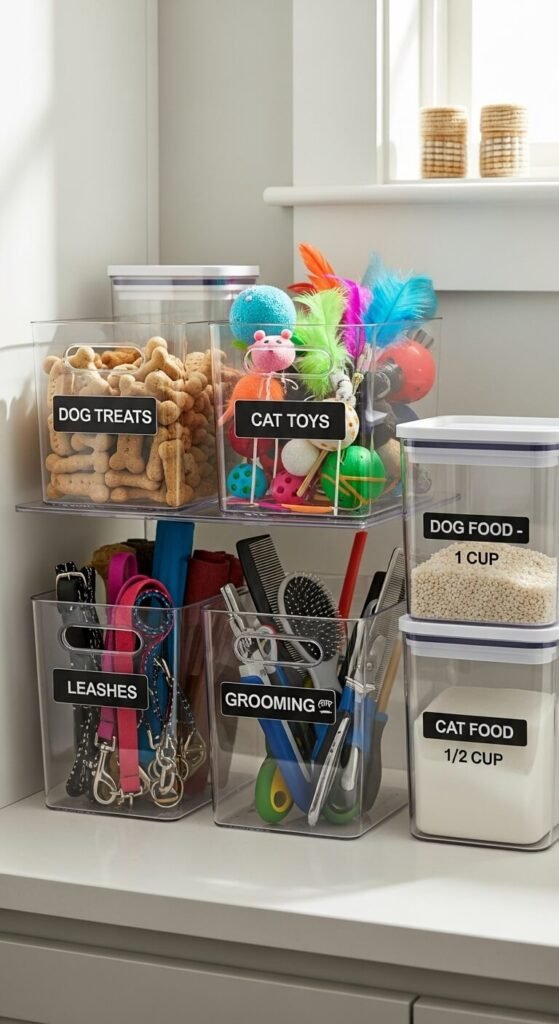
Simplify pet care routines with labeled food containers and supply bins.
Transfer pet food into airtight containers and label with the pet’s name and feeding amount. Store supplies in labeled bins: “Toys,” “Grooming,” “Medical.”
This helps pet sitters or family members feed correctly when you’re away. Include scooping measurements on food labels.
Airtight food containers (ten dollars each) keep kibble fresh and pests out. Small bins for supplies cost about five dollars. Label expiration dates on medication. Place everything in one pet station—labeled and ready. No more searching for the nail clippers or wondering how much to feed.
Organize Recipe Binders and Cookbooks
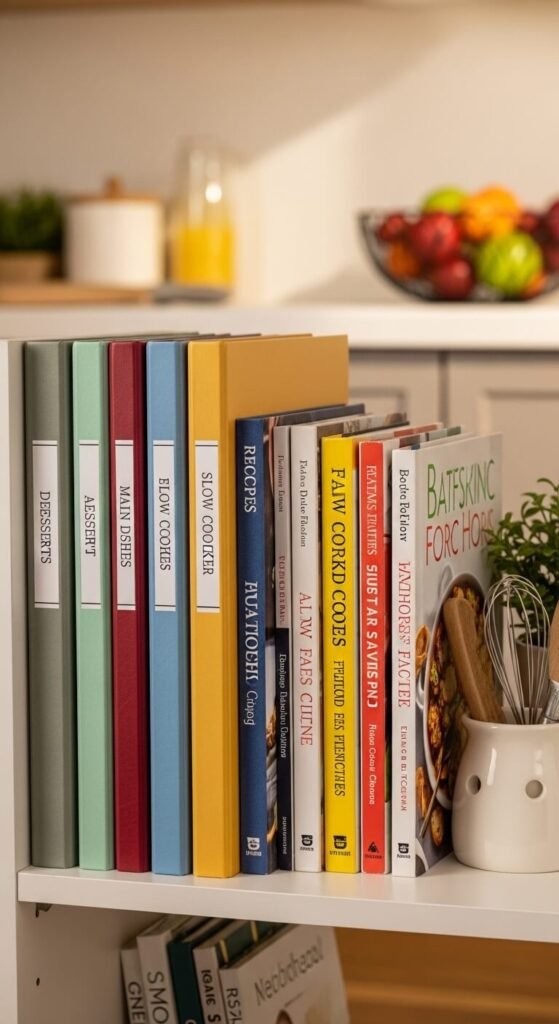
Find recipes quickly when binders and cookbooks have labeled spines.
Sort recipes into categories and label each binder: “Desserts,” “Weeknight Dinners,” “Holiday Meals.”
Stand binders on a shelf with labels facing out. Add labeled dividers inside for subcategories.
This beats flipping through every page searching for that one chicken recipe. Sheet protectors (ten dollars for 100) keep recipe cards and printed pages clean. Label cookbooks by cuisine type using small spine labels. Create a “Weekly Rotation” binder with go-to meals for busy nights.
Create a Mail Sorting Station
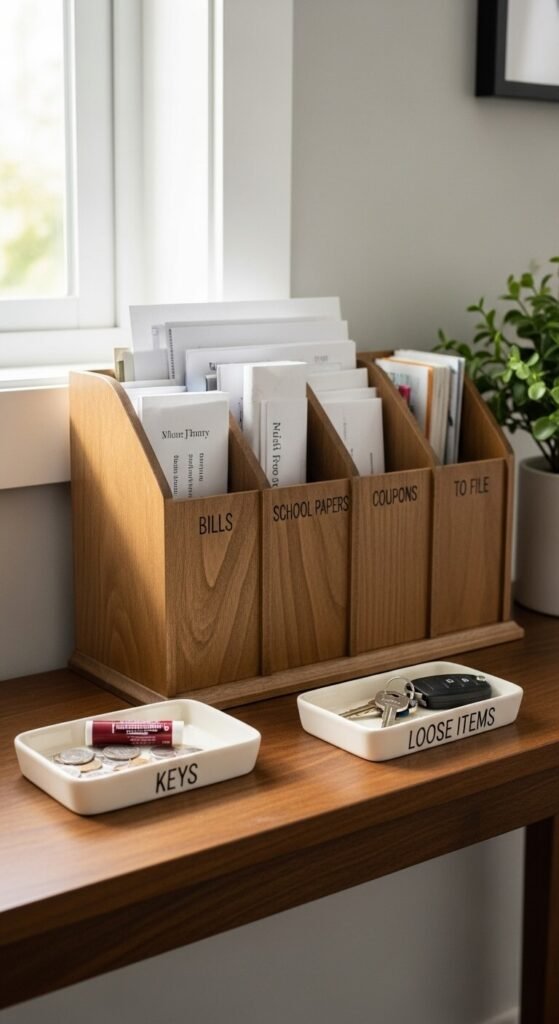
Stop mail piles with a labeled sorting station by your entry door.
Set up vertical file sorters or wall pockets. Label slots: “Bills to Pay,” “School Papers,” “To File,” “Coupons.”
Process mail immediately when walking in. Put each piece in its labeled slot.
This prevents kitchen counter clutter and lost bills. Vertical desktop file organizers cost about eight dollars. Wall-mounted options work in tight spaces. Add a small labeled box for outgoing mail. Check your “Bills” slot weekly. The whole family can sort mail when sections are clearly labeled.
Label Mudroom Hooks and Cubbies
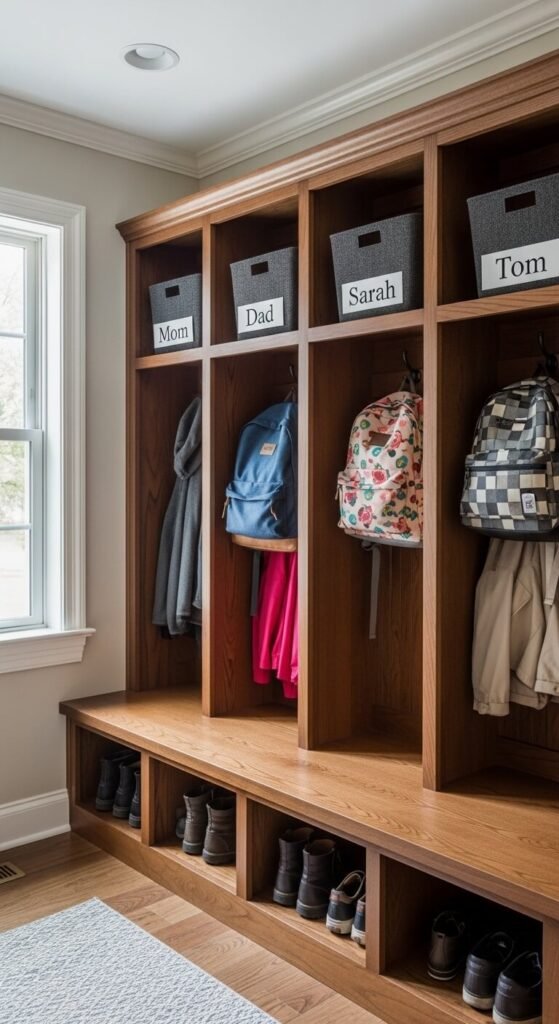
Give each family member a labeled spot for their stuff.
Put name labels above hooks or on cubby fronts: “Sarah,” “Mom,” “Dad,” “Jake.”
Everyone gets one hook for coats and one cubby for bags and shoes. No more fighting over space or “that’s my hook.”
This system works in entryways, mudrooms, or behind doors. Adhesive hooks (ten for five dollars) stick to any wall. Shoe cubbies or baskets (eight dollars each) contain the mess. Kids as young as three can use labeled personal spaces. Morning routines run smoother when everyone knows their designated spot.
Organize Craft Paint Bottles
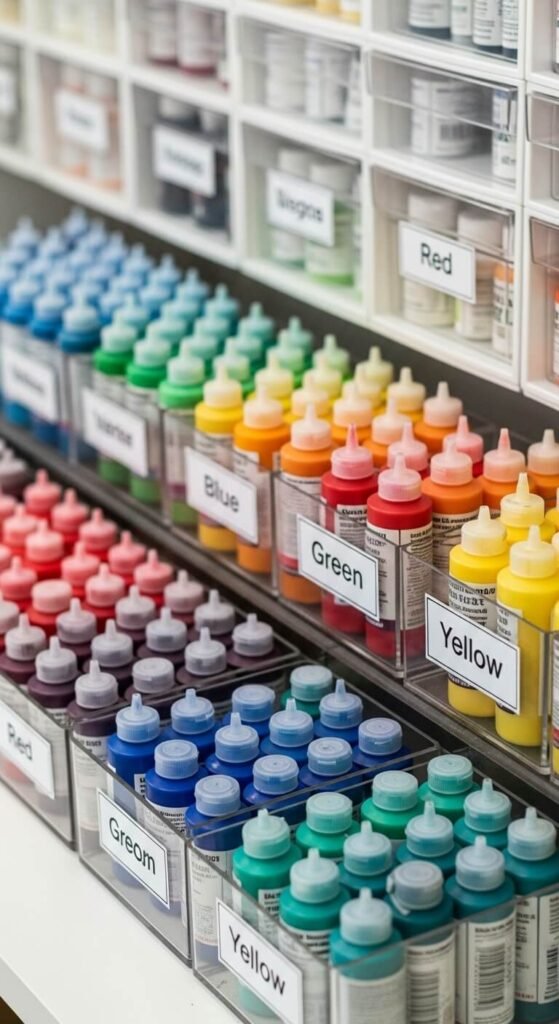
Sort paint by color family with labeled containers for easy access.
Group similar colors together in small bins or lazy susans. Label each section: “Reds,” “Blues,” “Greens,” “Metallics.”
Store bottles upside down so paint stays near the cap. This prevents dried-out tops.
Lazy susans (six dollars) work great on deep shelves—spin to reach back bottles. Small drawer organizers separate colors in flat storage. Label individual bottles with purchase dates if you buy multiples. Replace dried bottles and keep labels updated. Art projects start faster when you grab the right color immediately.
Mark Electronics and Remote Controls
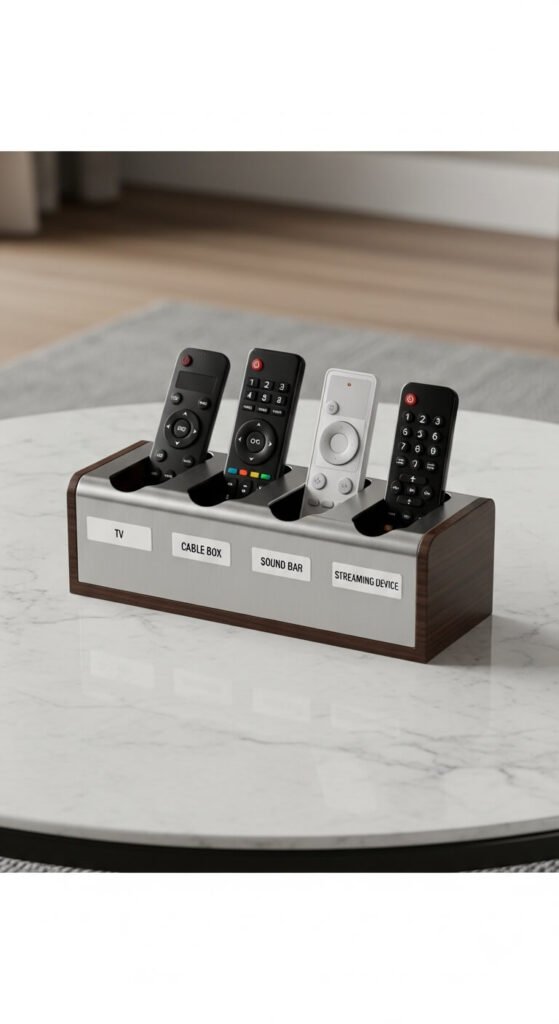
End remote confusion by labeling each one’s purpose.
Stick small labels on every remote: “TV,” “Cable,” “Sound Bar,” “Roku.” Use a labeled basket or caddy to corral them all.
This helps guests and grandparents operate your entertainment system. No more “which remote controls what” questions.
Remote caddies cost about six dollars and sit on coffee tables or attach to armrests. Label your universal remote’s buttons if you have one. Add battery size labels inside battery compartments. Takes two minutes to label remotes but saves countless “how do I watch TV” moments.
Create Medication Management Labels
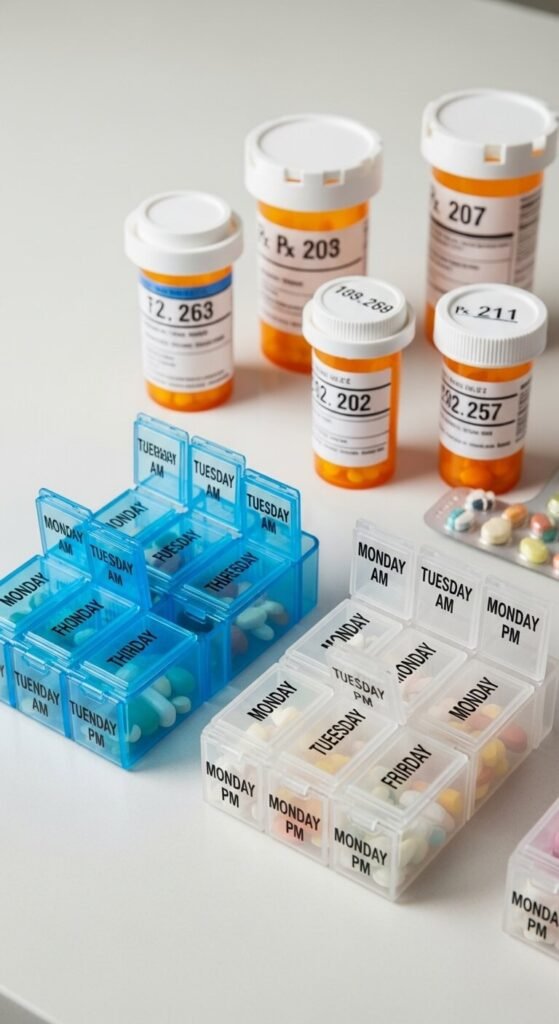
Track medications safely with day and time labels on pill organizers.
Use weekly pill boxes and label each compartment clearly. Add labels to prescription bottles with refill dates.
Set up a medication station with everything in one spot. Label shelves for different family members if you store multiple prescriptions.
This system prevents missed doses and double-taking pills. Clear pill organizers (five dollars) let you see if you took today’s dose. Label bottles with doctor names and pharmacy phone numbers. Large-print labels help anyone with vision challenges. Refill medications before running out by checking your labeled dates.
Organize Beauty and Skincare Products
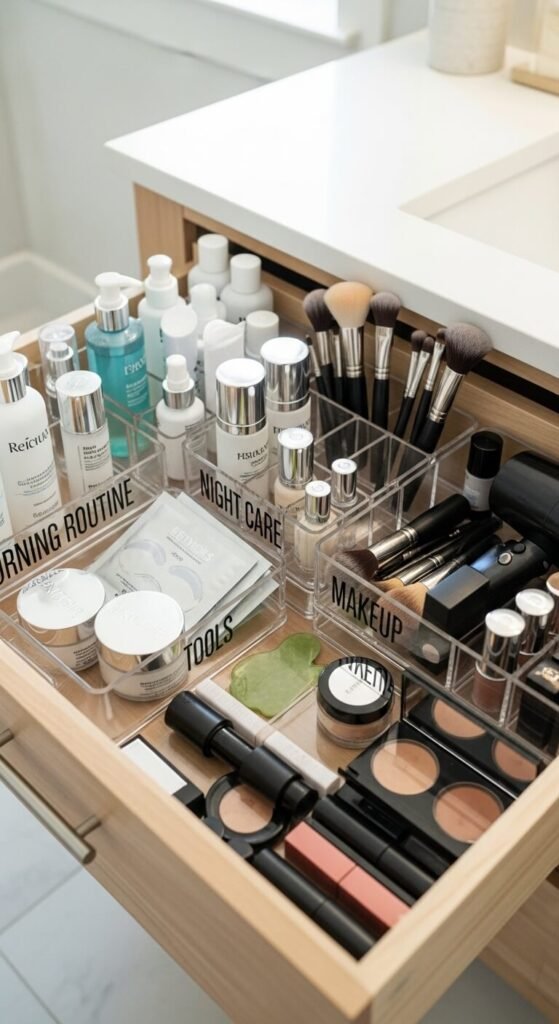
Streamline your routine with labeled beauty product zones.
Separate items by when you use them: “Morning,” “Evening,” “Weekly Treatments.” Label drawer dividers or containers.
Place everyday items in easily reached spots with clear labels. Store occasional products in back sections.
This cuts getting-ready time in half. Acrylic organizers (twelve dollars for sets) look clean and professional. Label expiration dates on skincare products—most open products last 6-12 months. Toss expired items when reorganizing. Clear labels help you grab face wash versus body wash in morning autopilot mode.
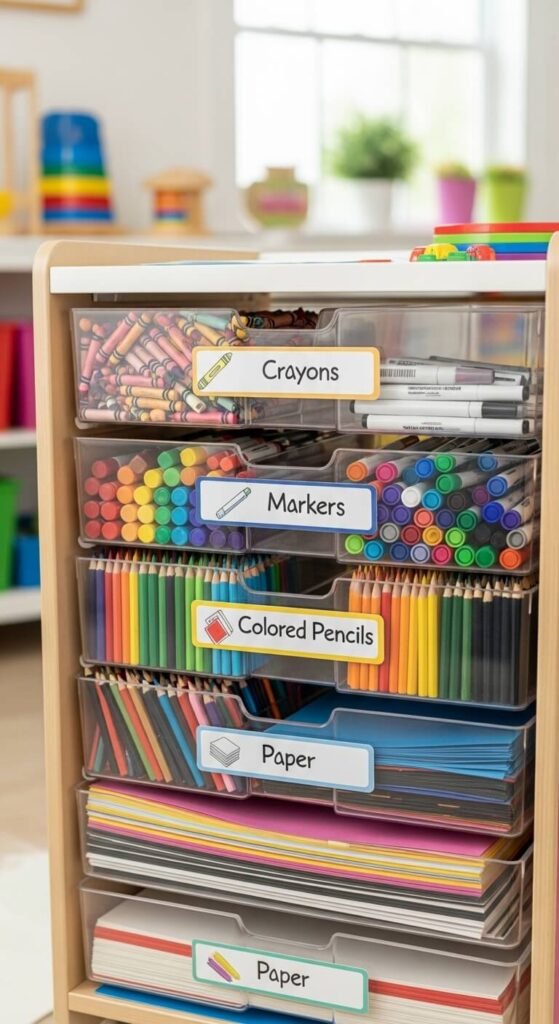
Tag Kids’ Art Supply Drawers
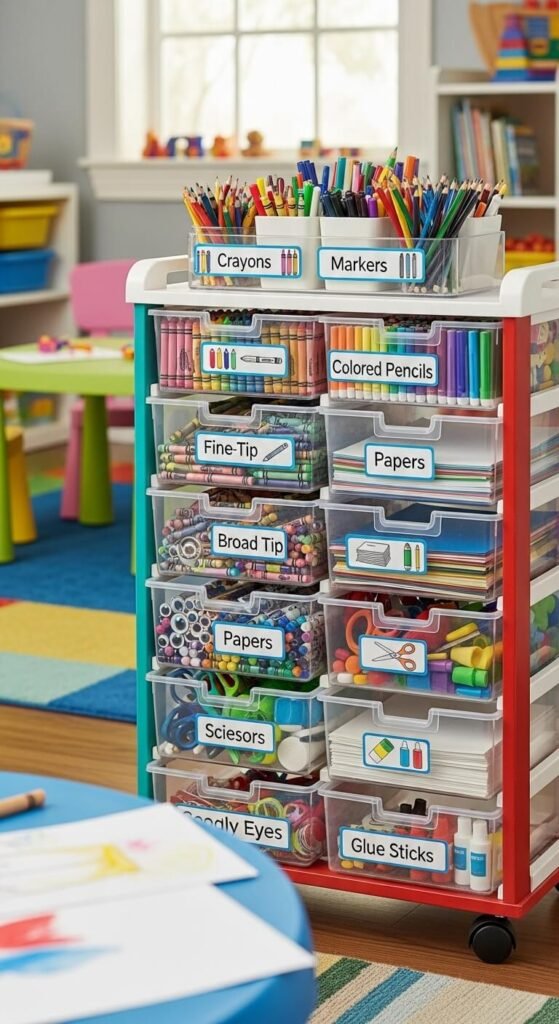
Support creativity with clearly labeled art supply drawers.
Sort supplies by type into different drawers. Label with pictures and words: “Crayons,” “Markers,” “Colored Pencils,” “Paper.”
Rolling carts (twenty dollars) move art supplies anywhere. Label drawer fronts so kids can clean up independently.
This prevents mixing markers with crayons and lost caps. Small drawer organizers (dollar store finds) separate different marker colors. Replace dried-out supplies during reorganizing sessions. Kids learn responsibility when they can read labels and return items correctly. Art time starts and ends faster with labeled, organized supplies.
Label Bathroom Cleaning Caddy
Speed up bathroom cleaning with a labeled portable caddy.
Put all bathroom cleaners in one handled caddy. Label each product clearly. Add a label to the caddy itself: “Bathroom Cleaning.”
Carry the whole caddy from bathroom to bathroom. No searching under sinks for the right product.
Shower caddies work perfectly for this and cost about five dollars. Label spray bottles with surface types: “Glass,” “Tile,” “Counters.” Include gloves and scrub brushes in the caddy. Store it under the main bathroom sink or in a hall closet. Labeled caddies make it easy for anyone to help with cleaning chores.
Conclusion
A label maker turns any messy space into an organized system that actually works. Start with one problem area—maybe your spice cabinet or charging cables—and label it completely. You’ll feel the difference right away when you find things on the first try. These simple labels help everyone in your home stay organized without constant reminders. Pick up a basic label maker for under 20 dollars and grab some containers you already own. Spend 15 minutes labeling one zone this weekend. Once you see how much easier life gets, you’ll want to label everything. Your future self will thank you every single time you reach for something and it’s exactly where the label says it should be.