You know that moment when you’re digging through a drawer for the third time looking for scissors, or when your garage tools are scattered across every surface? Yeah, we’ve all been there. Enter the pegboard: the unsung hero of organization that’s about to transform your chaotic spaces into Pinterest-worthy perfection. Whether you’re tackling a craft room, garage, or even your kitchen, pegboard is the customizable storage solution that makes everything visible, accessible, and surprisingly stylish.
Installing pegboard might sound intimidating, but trust me—if you can hang a picture frame, you can do this. Let’s walk through everything you need to know to create your own game-changing wall storage system.
Why Pegboard is a Total Game-Changer
Before we dive into the how-to, let’s talk about why pegboard deserves a spot in your home. Unlike fixed shelving, pegboard adapts to your changing needs. Need to rearrange your tools? Just move the hooks. Want to add more storage? Pop in another basket. It’s flexible, affordable, and turns dead wall space into serious storage real estate.
Plus, when done right, it looks absolutely gorgeous. We’re not talking about your grandpa’s dusty garage board here—modern pegboard installations are sleek, colorful, and totally Instagram-worthy.
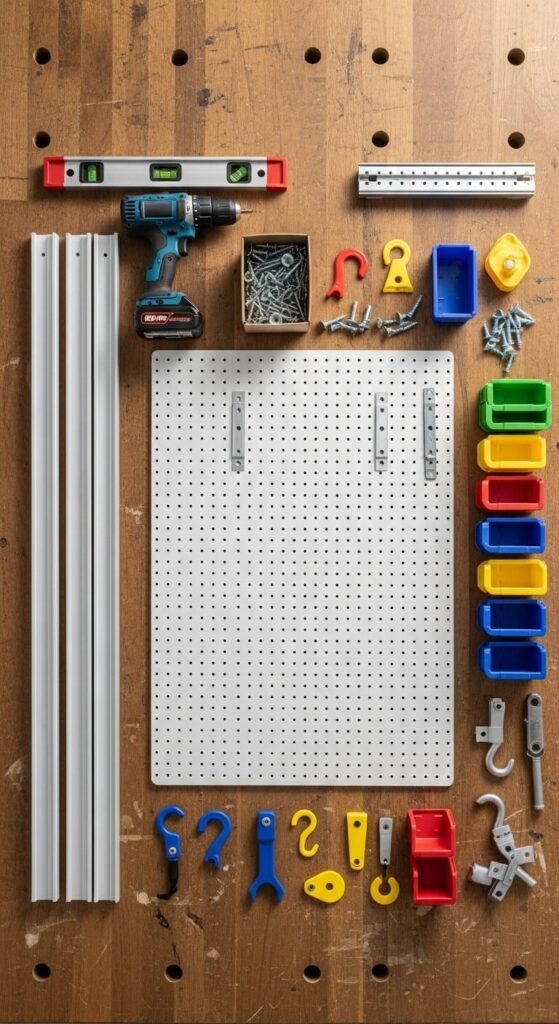
Gather Your Materials
Here’s what you’ll need to make this project happen:
- Pegboard panels (typically ¼” thick)
- Furring strips or spacers (¾” thick)
- Screws and wall anchors
- Level
- Drill and drill bits
- Stud finder
- Pencil
- Pegboard hooks, baskets, and shelves
- Optional: paint or stain for customization
Measure and Plan Your Space
First things first: decide where your pegboard is going and how much space you want to cover. Measure your wall area carefully, keeping in mind that pegboard typically comes in 2′ x 4′ or 4′ x 8′ sheets.
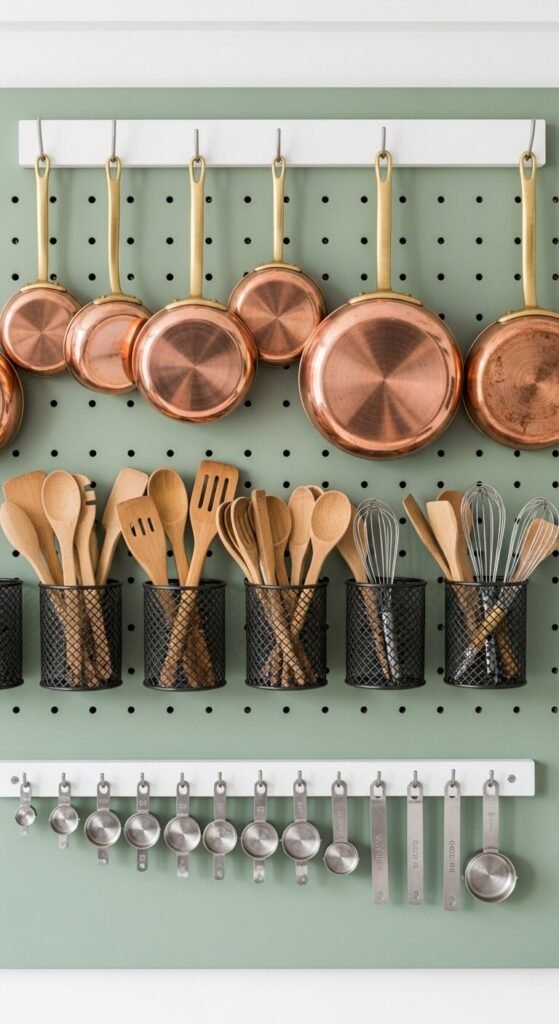
Pro tip: sketch out what you’ll be storing before you buy. This helps you choose the right size and visualize the final result. Will it be kitchen utensils? Power tools? Craft supplies? Your storage needs will determine your board size and layout.
Prep Your Pegboard (Optional But Awesome)
Want to take your pegboard from basic to breathtaking? Now’s the time to paint or stain it. Choose a color that complements your room—think crisp white for modern spaces, bold navy for dramatic impact, or natural wood tones for a rustic vibe.
Make sure to paint before installation and let it dry completely. Sand lightly between coats for a smooth, professional finish.
Install the Furring Strips
Here’s the crucial part many people miss: pegboard needs space behind it for the hooks to fit through. That’s where furring strips come in.
Use your stud finder to locate the wall studs, then mark them with a pencil. Attach horizontal furring strips to the wall using screws driven directly into the studs. You’ll want strips at the top, bottom, and middle of where your pegboard will hang.
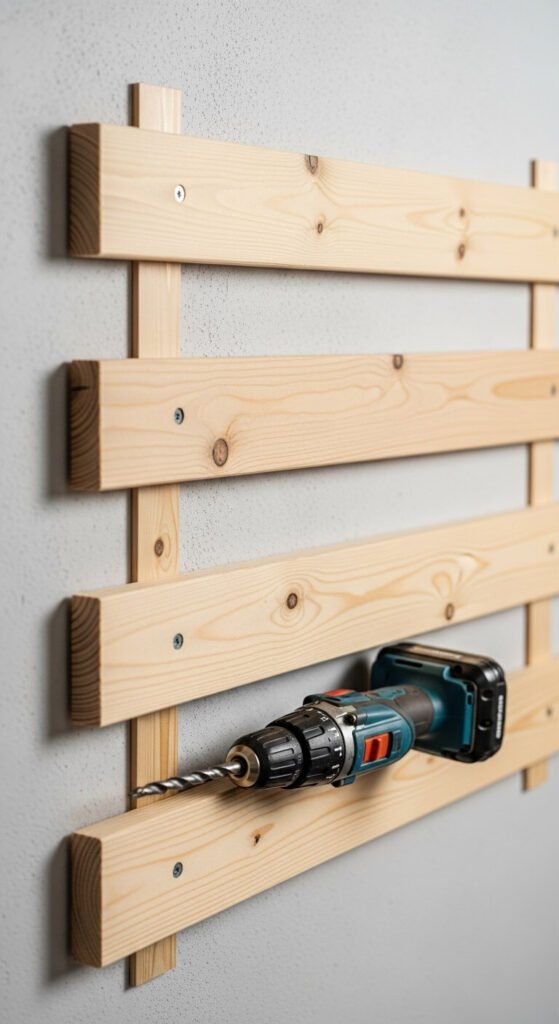
Make sure everything is level—this step sets the foundation for your entire project. A wonky pegboard is a sad pegboard.
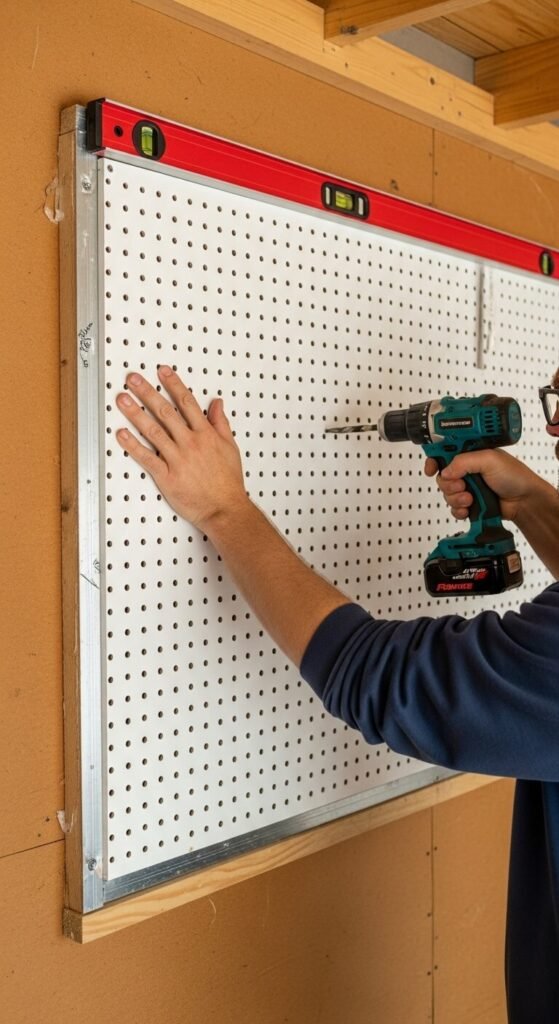
Mount Your Pegboard
Now for the satisfying part! Position your pegboard over the furring strips and drill pilot holes through the board into the strips. Then secure the pegboard with screws around all edges and through the middle for extra stability.
Double-check with your level as you go. You want this baby straight and secure because it’s about to hold a lot of weight.
For larger installations, consider working with a helper. Those 4′ x 8′ sheets can be unwieldy, and an extra set of hands makes the job infinitely easier.
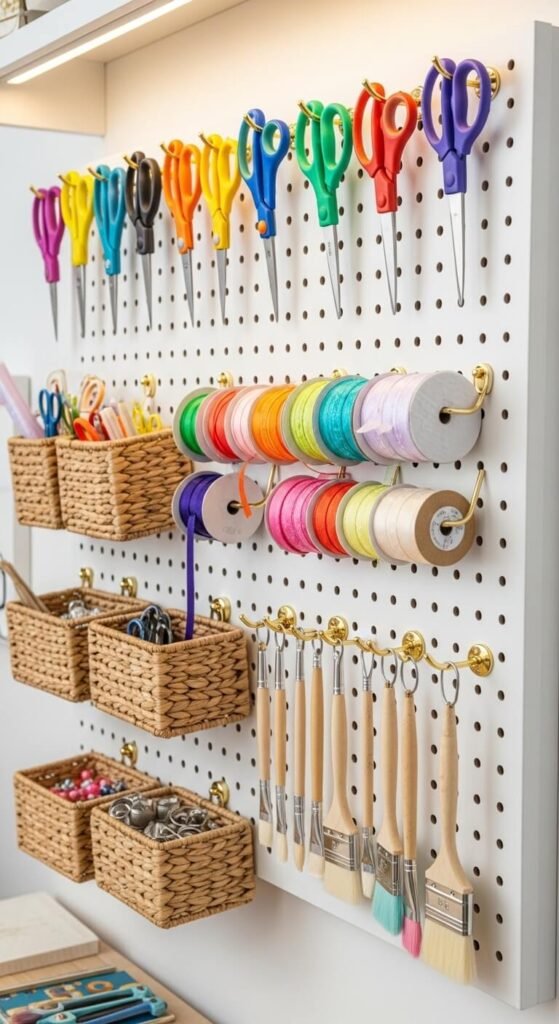
Add Your Hooks and Accessories
This is where the magic happens! Start arranging your pegboard hooks, shelves, and baskets. Play around with the configuration until you find what works best for your items.
Some layout tips:
- Put frequently used items at eye level
- Group similar items together
- Use baskets for small parts that might fall through
- Leave room for future additions
- Mix hook lengths for visual interest
Don’t be afraid to rearrange as you go. The beauty of pegboard is that nothing is permanent—experiment until it feels just right.
Keep It Organized (and Looking Good)
Once your pegboard is installed, the real fun begins. Take a photo of your final arrangement so you know where everything goes. Trace around your tools with a marker if you want that ultra-organized garage vibe, or keep things more flexible for spaces that change frequently.
Make it a habit to return items to their designated spots. Your future self will thank you when everything is exactly where you expect it to be.
Ready to reclaim your space and banish clutter for good? Pegboard installation is one of those weekend projects that pays dividends every single day. Whether you’re organizing craft supplies, kitchen tools, or garage equipment, you’ve now got the roadmap to create beautiful, functional storage that actually works for your life.
Save this guide and tag us in your pegboard transformation photos—we can’t wait to see what you create! 🔨✨