Every DIYer knows the feeling: you’re mid-project, one hand holding something in place, and the tool you need is buried somewhere in a toolbox under three other toolboxes at the back of the garage. By the time you find it, you’ve lost your place, your patience, and possibly your grip. Good tool storage isn’t about having a picture-perfect workshop — it’s about having what you need exactly when you need it, without a five-minute excavation. Whether you have a full garage, a small shed, or just a corner of a spare room, the right storage system makes every project faster, less frustrating, and honestly more enjoyable. Here’s how to build one that actually works.
Start With a Tool Audit and Use-Frequency Sort
Before a single hook goes into the wall, you need to know what you’re storing — and more importantly, how often you actually use it. Pull everything out and sort into three categories:
- Reach-for-it weekly: Hammer, screwdrivers, tape measure, level, drill — your everyday heroes
- Seasonal or project-specific: Tile saw, pipe wrench, caulk gun, oscillating tool — important but not daily
- Rarely used or broken: That mystery wrench from 1987, duplicate tools, anything that doesn’t function properly
The first group earns prime real estate — eye level, within arm’s reach of your main work area. The second group goes on lower shelves or in labeled bins. The third group gets donated, tossed, or given to someone who will actually use it.
This sort is the difference between a storage system you maintain effortlessly and one that creeps back into chaos within a month.
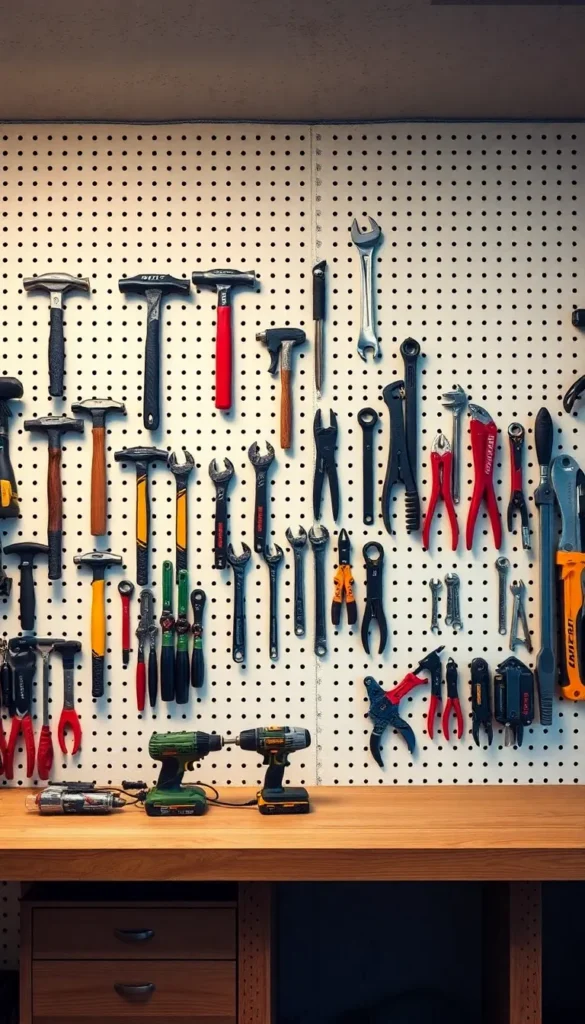
Build Around a Pegboard Wall Panel
If there’s one tool storage investment that pays off more than any other, it’s a pegboard wall. Pegboard is inexpensive, infinitely configurable, and puts every tool you own at eye level and instantly grabbable — no digging, no stacking, no searching.
Setting up pegboard the right way:
- Mount panels at least ¾ inch off the wall using spacers or a wood frame — hooks need clearance behind the board to stay secure
- Use ¼-inch pegboard for lighter hand tools; ⅜-inch for heavier items like clamps and power tools
- Paint the pegboard a light color before mounting — it makes the tools pop visually and helps you spot a missing tool immediately
- Add a mix of hook sizes: single hooks for small tools, double hooks for hammers and mallets, bins for screws and bits, and shelves for heavier items
That last tip — outlining each tool in pencil or paint — is what separates a functional pegboard from a great one. You know at a glance what’s missing before you even start a project.
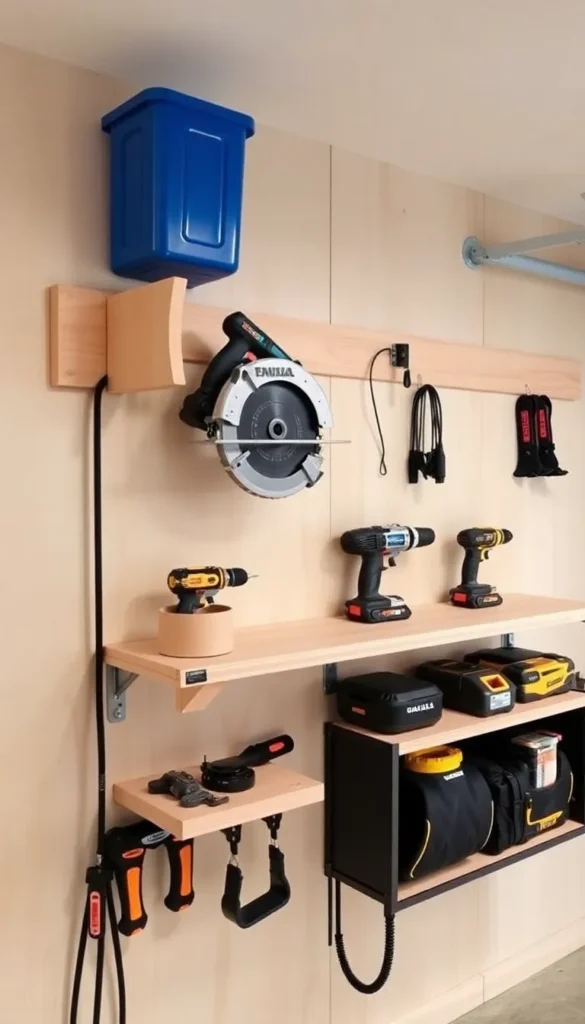
Add a French Cleat System for Heavy Tools
For power tools, heavy equipment, and anything too bulky for pegboard, a French cleat wall is the professional-grade upgrade that changes everything. It sounds technical but it’s just two angled wooden strips — one on the wall, one on the tool holder — that interlock and support remarkable weight.
Why French cleats are worth building:
- A single cleat strip can hold hundreds of pounds when properly anchored into studs
- Holders are completely modular — you can rearrange the entire wall layout without any new holes or hardware
- You can build custom holders for any tool shape: a drill holster, a circular saw shelf, a dedicated extension cord reel bracket

Use ¾-inch plywood for both the wall cleats and the holders — it’s strong, inexpensive, and easy to cut with basic tools. Set the wall cleats every 16 inches vertically and you’ll have a grid that holds anything.
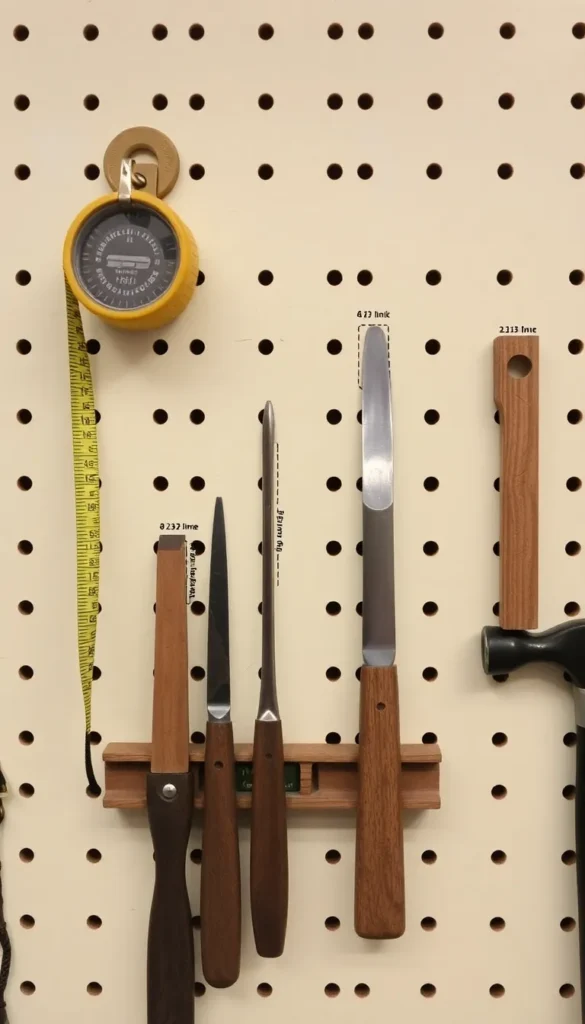
Organize Small Tools and Hardware With These Proven Systems
The big tools are the easy part. It’s the small stuff — drill bits, screws, Allen keys, sandpaper, blades — that creates the real chaos. A few dedicated systems keep the small tools as accessible as the large ones.
What works best:
- Clear stackable bins with labels: For screws, nails, bolts, and hardware sorted by size — clear front means you see inventory at a glance
- Magnetic tool bars: Mount on the side of a cabinet or under a shelf to hold metal tools — chisels, screwdrivers, allen keys — in a row without taking up any floor or shelf space
- A rolling cart with shallow drawers: For hand tools you use at the workbench — everything slides out flat, nothing gets buried under anything else
- A dedicated bit organizer: A wall-mounted case or countertop block for drill bits, driver bits, and router bits — sorted by type and size so the right bit is found in seconds, not minutes
The rule with small tools: if it takes more than ten seconds to find something, it needs a better home.
Label Everything and Commit to the Return Rule
The most beautifully built tool storage system fails without one non-negotiable habit: every tool goes back to its exact spot after every use. Not “near” its spot. Not “I’ll deal with it later.” Back. Exactly. Every time.
To make this effortless:
- Label every hook, bin, and drawer — even if it seems obvious now, labels make it obvious to anyone in the household, not just you
- Outline tool silhouettes on pegboard so the empty spot is immediately visible
- Keep a “needs a home” bin for tools without a designated spot yet — deal with it weekly rather than letting it overflow
- Do a five-minute reset after every project — returning tools while the project is wrapping up takes minutes and prevents the slow drift back to chaos
A Workshop That Works as Hard as You Do
The best tool storage isn’t the most expensive or the most elaborate — it’s the system that makes the right tool findable in under ten seconds, every single time. Pegboard for hand tools, French cleats for power tools, clear bins for hardware, and one firm return rule. That’s the whole system.
Build it once, maintain it with one simple habit, and every project you tackle from here on starts with confidence instead of a search party.
Save this article to your workshop organization board and share it with the DIYer in your life who deserves a garage that finally works as hard as they do! 🔧