Tired of mismatched bins cluttering your shelves, or baskets that are almost the right size but never quite perfect? Making your own fabric storage boxes is one of those DIY projects that feels fancy but is surprisingly beginner-friendly — and the payoff is huge. You get custom sizes, your exact colors, and that deeply satisfying “I made that” moment every time you walk past your bookshelf.
Let’s walk through exactly how to make fabric storage boxes that slide perfectly into any shelf, cubby, or basket you own.
What You’ll Need
Before you cut a single piece of fabric, gather your supplies. The good news? This project uses minimal materials and no special equipment.
- Outer fabric – A medium-weight cotton or linen blend works best. Quilting cotton, canvas, or even a repurposed curtain panel are all great options.
- Lining fabric – A coordinating cotton print or a solid neutral keeps things tidy inside.
- Fusible interfacing (medium weight) – This is the secret to structured, stand-up sides. Don’t skip it.
- Scissors or rotary cutter + cutting mat
- Sewing machine + matching thread
- Iron and ironing board
- Measuring tape and fabric marker
Step 1 — Measure Your Space First
This is the most important step, and it’s the one most tutorials skip too fast. Grab your measuring tape and write down the interior dimensions of your shelf or basket:
- Width (left to right)
- Depth (front to back)
- Desired height of your box
Subtract about ½ inch from the width and depth to give your finished box a little breathing room. A box that’s just the right size will slide in and out effortlessly instead of requiring a wrestling match every time.

Step 2 — Cut Your Fabric Pieces
For a box that is W wide, D deep, and H tall, here’s your cutting formula:
- Outer fabric: Cut one rectangle that measures (W + 2H) x (D + 2H)
- Lining fabric: Cut one rectangle the same size
- Interfacing: Cut to match both pieces
The corners will be cut out and folded up to form the box shape — a technique called “boxing corners.” It sounds fancier than it is.
To cut the corners: At each corner of your rectangles, cut a square that measures H x H. You’ll do this on all four corners of both the outer and lining pieces.
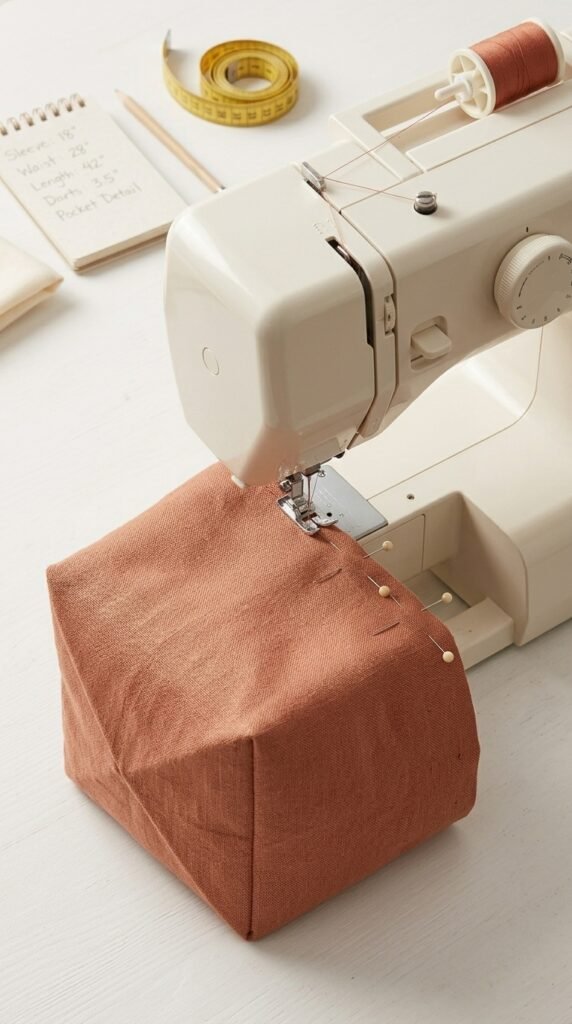
Step 3 — Apply the Interfacing and Assemble
Iron your fusible interfacing to the wrong side of your outer fabric, following the package instructions. This step is what turns floppy cotton into a box that actually holds its shape.
Assembly steps:
- Fold and pin the cut corners of the outer fabric together (right sides facing), and sew with a ½-inch seam. Repeat on all four corners. This creates the box shape.
- Do the same for your lining fabric — but leave a 3-inch gap along one bottom seam for turning.
- Place the outer box inside the lining box, right sides together. Match the top edges and pin.
- Sew around the entire top edge with a ½-inch seam.
- Pull the outer box through the gap in the lining. Pop the lining down inside the box.
- Stitch the gap in the lining closed, then topstitch around the top edge for a polished finish.
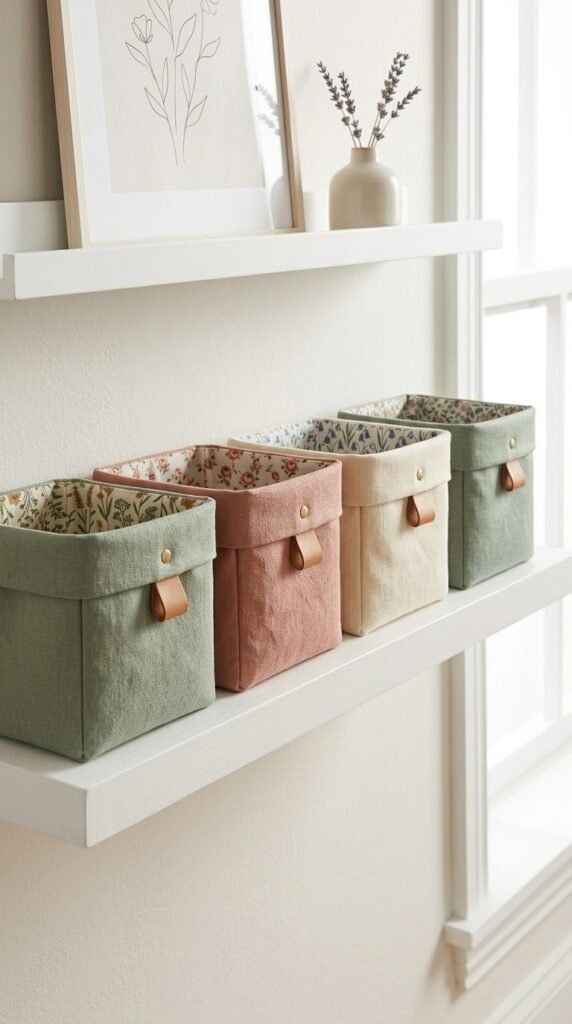
Step 4 — Customize and Style
This is the fun part. A few ideas to make your boxes feel intentional and Pinterest-worthy:
- Add a fabric tab or leather pull to the front for easy grabbing
- Fold the top edge down for a cuffed look that shows off your lining fabric
- Use iron-on letters or simple hand embroidery to label each box
- Mix and match solids with prints — a neutral outside with a bold, patterned lining feels elevated without being loud
Tips for Getting a Perfect Fit Every Time
- Stiff interfacing = structured box. If your box is looking floppy, size up to a heavier interfacing or add a second layer.
- Press every seam with your iron. It takes an extra two minutes and makes a noticeable difference in how crisp the final box looks.
- Make a mock-up first. Cut your pattern from cheap muslin or an old sheet before cutting into your good fabric — especially for oddly shaped baskets.
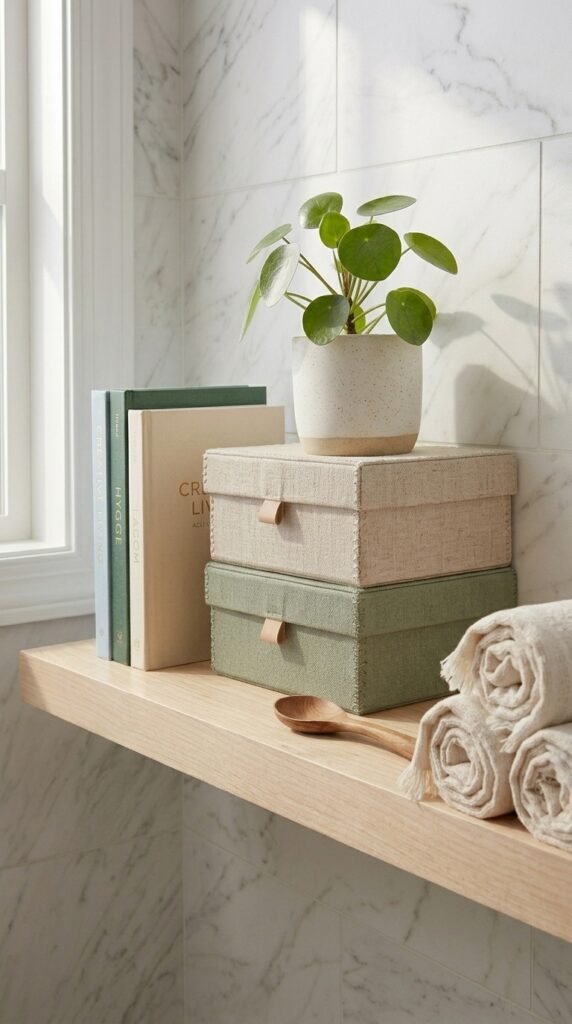
Your Shelves Will Never Look the Same
Once you make one, you’ll want a set for every room in the house. Fabric storage boxes are genuinely one of the best organizational upgrades you can make — and they’re infinitely more satisfying when you made them yourself to fit your exact space.
Save this tutorial, grab your fabric scraps, and start measuring! Your perfectly organized shelves are closer than you think. 📌