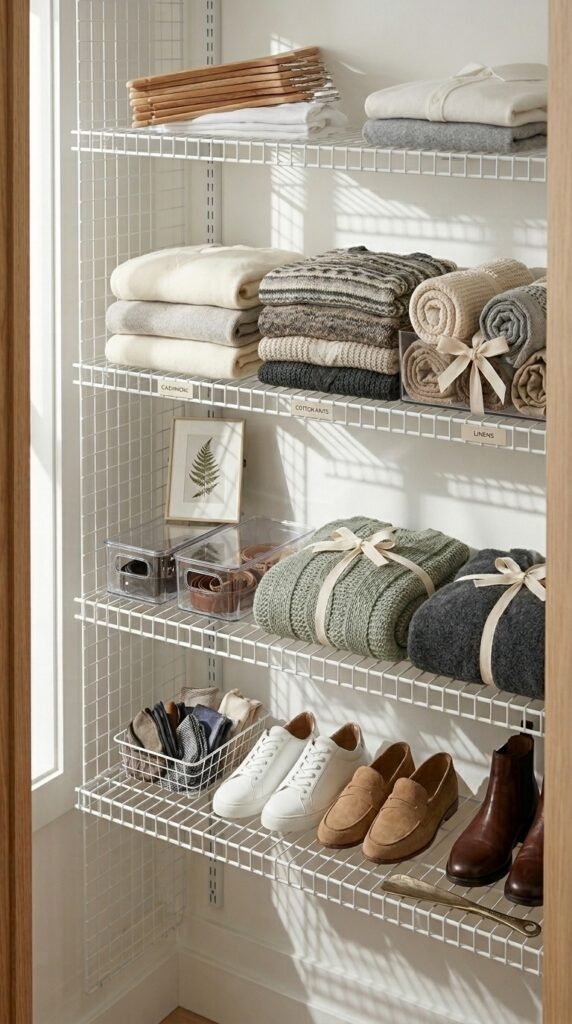
Imagine opening your closet door and actually seeing everything inside — no avalanche of shoes, no mystery pile on the floor, just clean, organized shelves holding your life together. Wire shelving makes that dream totally achievable, and the best part? You can install it yourself in a single afternoon without breaking the bank.
Whether you’re tackling a walk-in closet, a small reach-in, or even a pantry, this step-by-step guide walks you through everything you need to know to get it done right.
Why Wire Shelving Is a Game-Changer
Before you grab a drill, let’s talk about why wire shelving deserves a spot on your organization radar:
- Budget-friendly – A basic wire shelving kit from a home improvement store runs between $20–$60, far cheaper than custom built-ins.
- Ventilated design – Air circulates freely, so clothes and linens stay fresh (no musty smell!).
- Easy to adjust – Most systems let you move shelves up or down without major effort.
- DIY-friendly – No advanced carpentry skills required.
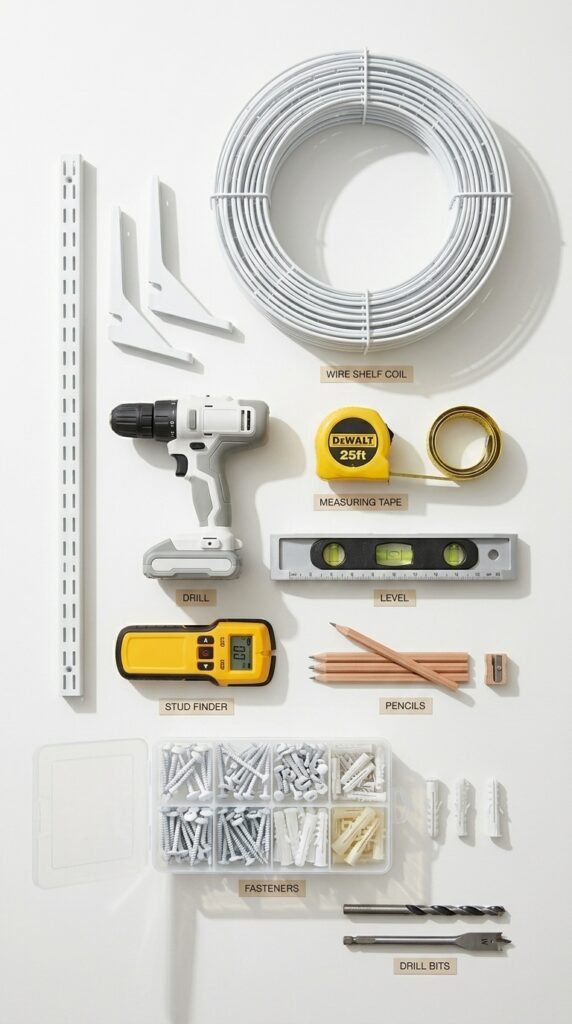
What You’ll Need
Gather your supplies before you start so you’re not hunting for a screwdriver mid-project.
Tools:
- Stud finder
- Level
- Drill with Phillips-head and drill bits
- Pencil
- Measuring tape
- Hacksaw or bolt cutters (if you need to cut shelving)
Materials:
- Wire shelving (measured to your closet width)
- Wall brackets and end caps (usually included in kits)
- Wall anchors and screws
- Back wall clips (one every 12 inches)
Step 1 — Measure Your Space
The golden rule: measure twice, cut once.
Use your measuring tape to record:
- The width of your closet (wall to wall)
- The desired shelf height (standard is 84 inches for a double hang rod setup, or 66 inches for a single shelf)
- How deep you want your shelves (12 inches for linen/accessories, 16 inches for clothing)
Mark your measurements lightly with a pencil. If your closet has corners, measure each wall section separately.
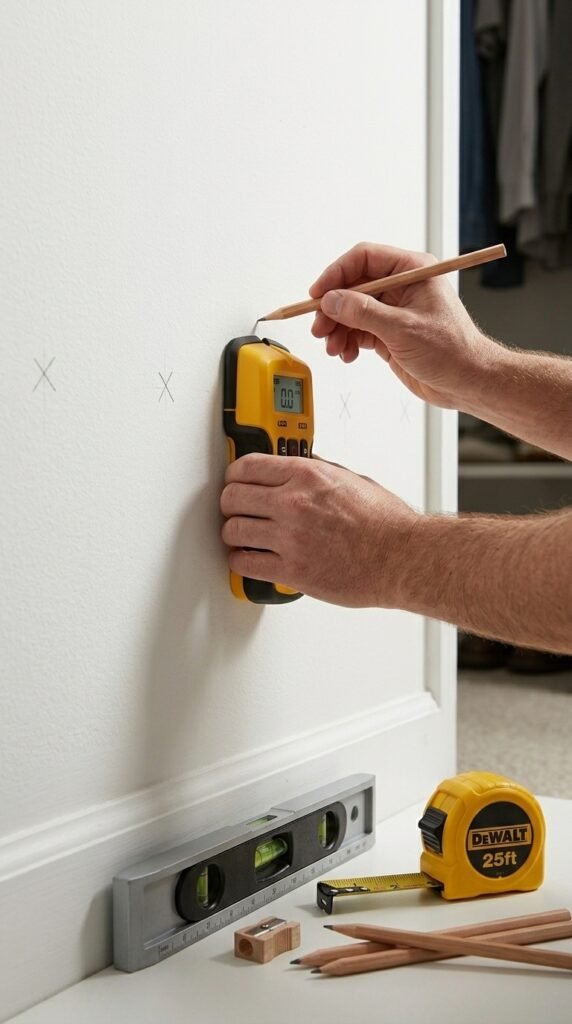
Step 2 — Find Your Studs and Mark the Wall
This step is what separates a sturdy shelf from a collapsed disaster.
Run your stud finder horizontally along the wall at your desired shelf height. Mark each stud location with a small pencil dot. Most studs are 16 inches apart.
Pro tip: If your shelving falls between studs, don’t panic — use drywall anchors rated for at least 50 lbs. They grip the drywall securely and are surprisingly strong.
Once your studs are marked, use your level to draw a faint horizontal guideline across the full width of the wall. This ensures your shelf sits straight.
Step 3 — Install the Back Wall Clips
Back wall clips are the small plastic brackets that support the back edge of your wire shelf.
- Space them every 12 inches along your guideline
- Pre-drill pilot holes to prevent the wall from cracking
- Drive screws directly into studs where possible; use anchors elsewhere
- Snap the clips onto the guide rail (a long metal strip) before mounting, or install individually — depends on your kit
Don’t skip this step! These clips carry a surprising amount of the shelf’s weight.
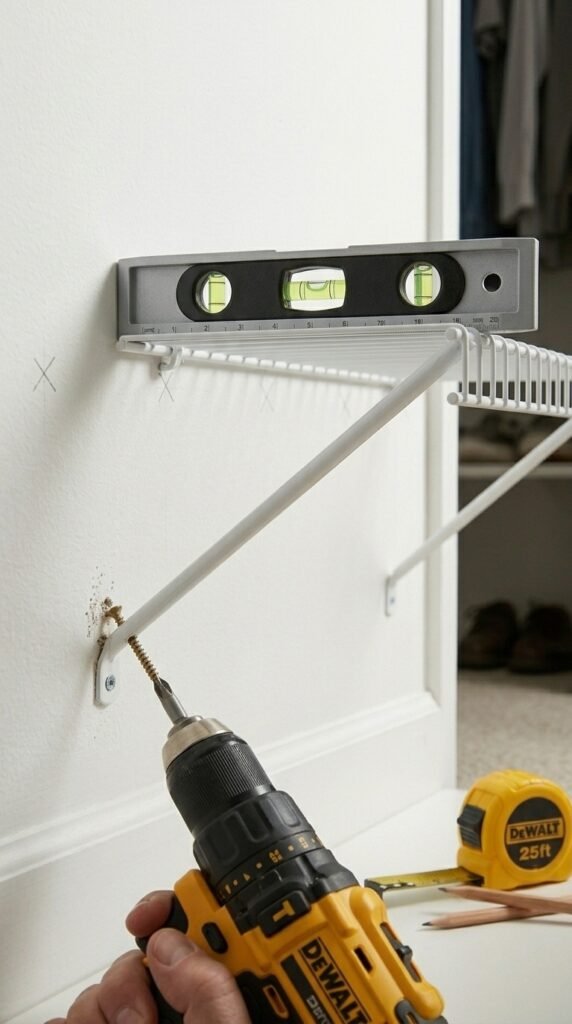
Step 4 — Mount the Side Brackets and End Brackets
Side wall brackets angle down from the wall and support the front edge of the shelf. Install one on each side wall, lined up with your guideline height.
End caps go on the cut ends of the shelf to prevent sharp wire edges from snagging clothing.
Step 5 — Slide in the Shelf and Secure It
Now for the satisfying part — actually placing your shelf!
- Angle the shelf up and rest the back edge into the wall clips
- Lower the front edge onto the side brackets
- Snap or clip the shelf into place according to your kit’s instructions
- Give it a firm push to make sure everything is locked in
Test your work by pressing down firmly on the shelf. No wobble? You’re done!
Quick Tips for a Cleaner Result
- Paint the wall first — It’s nearly impossible to paint around installed shelving later.
- Use shelf liner — A roll of non-slip liner prevents small items from falling through the wire gaps.
- Double-rod it — Install two levels of shelving for hanging short items like shirts and jackets to maximize vertical space.
- Label sections — Use small tags or baskets with labels to keep categories visible at a glance.
Your Closet Transformation Starts Today
Installing wire shelving is one of the most satisfying and affordable home upgrades you can tackle in a weekend. In just a few hours, you go from a cluttered chaos zone to a calm, functional space where everything has a home.
Save this guide for your next organization project — and share it with a friend whose closet could use a little love! Once you master one closet, you’ll want to do every room in the house.