Tangled cables snaking across your nightstand, a power strip buried under a pile of cords, chargers dangling off every surface — sound familiar? Your charging chaos ends today. A DIY charging station doesn’t just clean up the mess; it transforms one of the most cluttered spots in your home into something that actually looks intentional. And the best part? You probably already have most of what you need.

What You’ll Need Before You Start
You don’t need to be a woodworking pro or spend a fortune. Here’s a simple materials list to get you going:
- A wooden box or decorative basket (thrift stores are goldmines for these)
- A multi-port USB charging hub or a slim power strip
- A hole saw or drill bit (for cutting cable entry points)
- Cable clips or zip ties for organizing inside
- Felt or non-slip liner for the bottom
- A label maker or small tags (optional but satisfying)
The size of your box depends on how many devices you’re charging. A household with four people and their gadgets? Go bigger. A solo setup for just your phone and watch? A small wooden crate does the job perfectly.
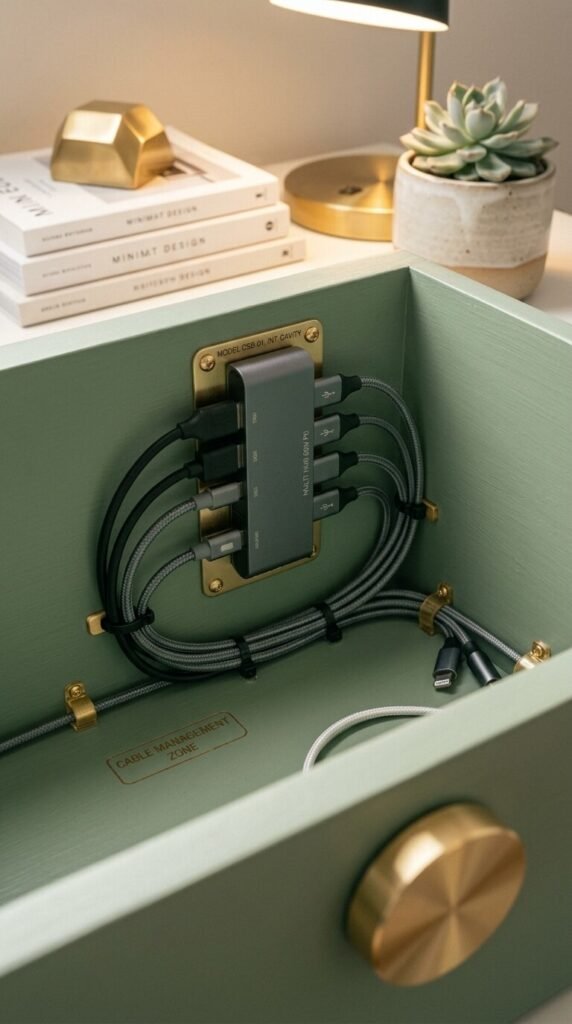
Step 1 — Prep Your Box
Start by choosing a container with a lid — that’s the secret weapon here. The lid hides everything when devices aren’t charging and keeps the station looking tidy around the clock.
Once you have your box:
- Measure and mark where you want the cable holes — usually one on each side or on the back.
- Drill the holes using a hole saw (about 1–1.5 inches in diameter works for most cable bundles).
- Sand down the edges of the holes so cables don’t fray over time.
- Line the inside bottom with felt to protect your devices from scratches.

Step 2 — Set Up the Power Inside
This step is where the magic happens. Instead of plugging your charger directly into the wall, you’re going to hide the power source inside the box.
- Thread your power strip or USB hub’s power cable out through one of the holes and plug it into the wall.
- Place the hub inside the box — this is your hidden power center.
- Route each device’s charging cable through the other holes so the cable ends sit neatly on top of the lid or along the edges.
Pro tip: Use right-angle USB adapters to keep cables lying flat and prevent awkward bends inside the box.

Step 3 — Organize and Label Each Cable
Nothing kills a clean aesthetic faster than grabbing the wrong cable in the dark. Label everything.
- Use small cable tags or a label maker to mark each cord: “Phone,” “Watch,” “Tablet,” etc.
- Velcro cable ties let you adjust as your device lineup changes.
- Leave a bit of slack in each cable — enough to pull a device out and set it on top of the station without tugging.
If you’re charging multiple devices at once, consider cutting small notches in the lid’s edge so cables peek through cleanly when the lid is closed over devices.
Step 4 — Style the Outside
Now that the function is sorted, make it look good. A charging station that blends into your decor is one you’ll actually keep using.
- Stain or paint the box to match your room’s palette.
- Add decorative hardware — a few gold drawer pulls instantly upgrade a plain wooden box.
- Style the top with a small plant, a candle, or a framed photo so the station doubles as a decorative surface.
The Finished Result Is Worth It
Once everything’s plugged in, tucked away, and labeled, you’ll wonder how you lived without this. Devices charge overnight inside a closed box. No more visual clutter. No more untangling cords in a groggy morning stupor.
The whole project takes about an hour and costs anywhere from $15–$40 depending on your materials — far less than store-bought charging stations that often don’t fit your specific device lineup anyway.
Save this tutorial and make it your weekend project! Your future self — the one waking up to a calm, clutter-free nightstand — will absolutely thank you.