Picture this: it’s 11 PM on Christmas Eve, you’ve found the perfect gift, and now you’re on your knees digging through a closet avalanche of crumpled paper, tangled ribbon, and missing tape. Sound familiar? A little organization goes a long way — and the good news is, you don’t need a whole weekend to pull it off. Here’s how to set up a gift wrap station that actually works when time is not on your side.
Step 1: Do a Quick Purge First
Before you organize anything, toss what’s holding you back. Go through your current stash and get rid of:
- Wrapping paper shorter than 12 inches — not enough to wrap anything useful
- Dried-out tape dispensers or pens that don’t write
- Ribbon that’s hopelessly tangled or faded
- Gift bags with torn handles or crushed bottoms
This step takes 10 minutes max and immediately makes the rest easier. You want to keep only what you’d actually grab in a hurry.
Step 2: Group Everything by Category
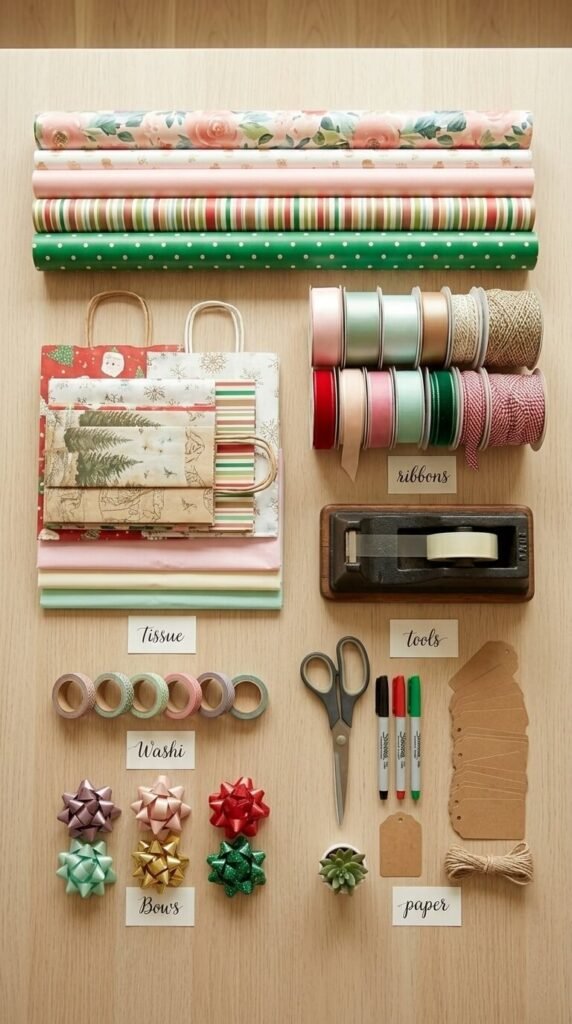
Once you’ve cleared the clutter, sort your supplies into three core groups:
- Paper & Bags — wrapping paper rolls, gift bags, tissue paper, kraft paper
- Embellishments — ribbon, bows, gift tags, stickers, twine
- Tools — tape, scissors, markers, labels, a bone folder if you’re fancy
Keeping like with like means you’re never searching for scissors while your paper is already cut. When everything has a category, restocking is easier too.
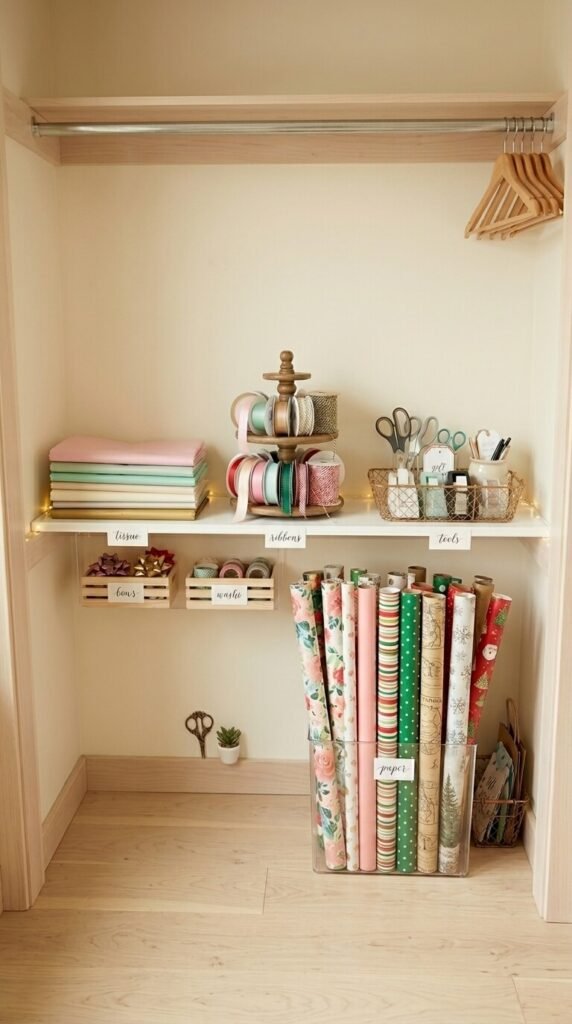
Step 3: Find the Right Storage for Each Category
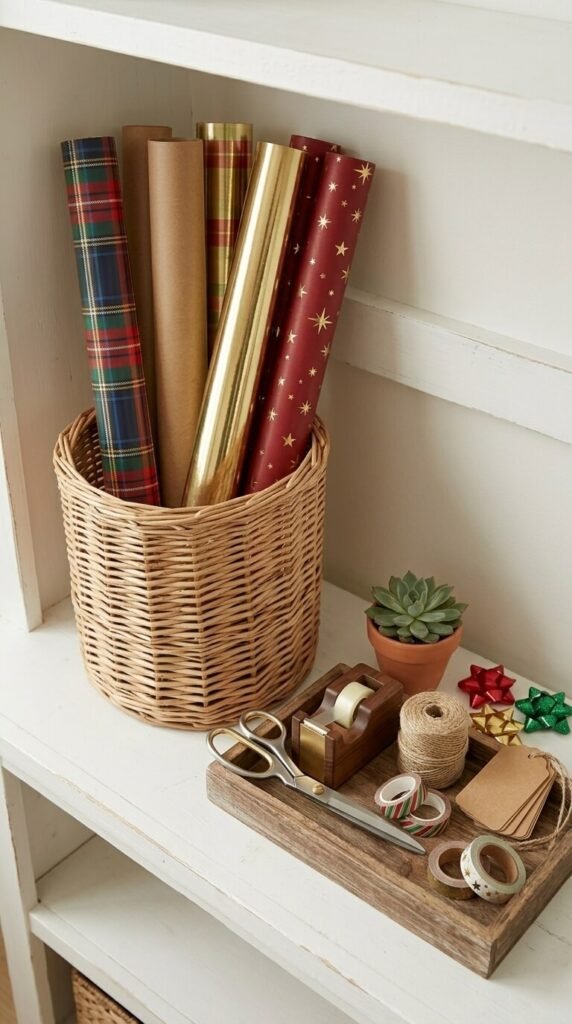
For wrapping paper rolls, go vertical. A tall, narrow bin, a wine rack, or even a repurposed umbrella stand keeps rolls upright, visible, and easy to grab. No more unrolling half a sheet to figure out what pattern is hiding inside.
For ribbon and bows, a clear stackable bin or a small drawer organizer works perfectly. If you have a lot of ribbon spools, thread them onto a dowel rod inside a box so they unroll without tangling.
For tools and embellishments, a small caddy or portable tote is your best friend for last-minute wrapping. You can grab the whole thing, bring it to the couch, and have everything within reach without making multiple trips.
Step 4: Build a “Grab-and-Go” Kit
This is the secret weapon for last-minute wrapping. Designate one small bin or bag as your emergency kit and keep it stocked at all times with:
- 1–2 sheets of neutral wrapping paper (kraft or white works for any occasion)
- A few gift bags in different sizes
- A roll of tape
- Scissors
- Basic tags or a marker
- A handful of bows
When you use something from the kit, replace it immediately. This way, even when your main stash is a mess, you always have a backup plan.
Step 5: Pick a Dedicated Storage Spot
Consistency is everything. Once you’ve organized your supplies, commit to one spot — a closet shelf, under-bed storage, a rolling cart, or a cabinet. The goal is that anyone in the house could find the gift wrap in under 60 seconds.
A few spot options that work especially well:
- Closet shelf with a curtain — keeps it tidy and hidden
- Over-the-door organizer — great for small supplies and bags
- Rolling cart — easy to wheel out and put away
- Flat under-bed storage box — perfect for paper rolls laid horizontally

One More Thing: Label Everything
A quick label on each bin or drawer is the step most people skip — and the one they always regret. You don’t need a label maker. A strip of masking tape and a marker works just fine. When supplies are labeled, restocking becomes automatic and nothing ends up in the wrong bin.
The Bottom Line
Last-minute wrapping stress is almost always a storage problem in disguise. When your supplies are sorted, accessible, and ready to go, wrapping a gift takes minutes instead of a meltdown. Start with the purge, build your grab-and-go kit, and pick one permanent spot. That’s really all it takes.
Save this post for your next big organizing weekend — or honestly, tackle it this afternoon. Future-you will be so glad you did.