The first genuinely warm day of spring is pure magic — until you open your closet and realize it still looks like February in there. Heavy coats taking up prime real estate, chunky sweaters blocking your view of everything lighter, and your entire spring wardrobe buried somewhere underneath it all. The seasonal clothing swap is one of those tasks that sounds tedious but delivers an almost unreasonable amount of satisfaction when it’s done. Do it right once, and next winter’s you will be genuinely grateful. Here’s exactly how to make it happen.
Step 1: Pick the Right Moment to Switch
Timing your seasonal swap matters more than most people realize. Switch too early and you’ll be pulling your coat back out within the week. Wait too long and you’ve lost weeks of closet clarity.
A good rule of thumb: wait until your 10-day forecast shows consistently mild temperatures with nighttime lows staying above 50°F (10°C). In most climates, that’s sometime between late March and mid-May depending on where you live.
Before you officially pack away winter pieces, set aside a “transition pile” — a small selection of items to keep accessible for cool evenings, unexpected cold snaps, or early morning chills:
- One lightweight jacket or denim jacket
- One or two long-sleeve tops
- A single mid-weight layer like a cardigan
- One pair of warmer trousers or jeans
Everything else in the winter collection is fair game for storage.
Step 2: Wash and Inspect Before You Store Anything
This is the step most people skip — and it’s also the reason they pull out musty, stained, or moth-damaged clothes the following autumn. Never store winter clothing dirty.
Body oils, invisible food residue, and even light perfume act as attractants for moths and other fabric pests. A quick wash before storage eliminates the problem entirely.
As you launder each item, inspect it carefully:
- Pilling — use a fabric shaver to restore knitwear before packing
- Loose buttons or broken zippers — repair now so items are ready to wear next season
- Stains — treat and rewash before storing; stains set permanently over months in storage
- Worn-through areas or damage — decide now whether to repair, repurpose, or donate
This inspection step also doubles as a natural edit. If something has seen better days and you’re not committed to fixing it, this is the perfect moment to let it go.

Step 3: Edit Your Winter Wardrobe Honestly
Before a single item goes into storage, take 20 minutes to assess what’s actually worth keeping. Storing items you won’t wear next year just means doing this work all over again in October.
Ask yourself honestly for each piece:
- Did I wear this at all this winter?
- Does it still fit well and feel good?
- Is it in good enough condition to wear again?
- Would I buy it today if I saw it in a store?
Create three piles: Keep, Donate, and Discard. Anything damaged beyond wear goes in the bin. Anything wearable but unloved goes to donation. Only the genuine keepers earn a spot in storage.
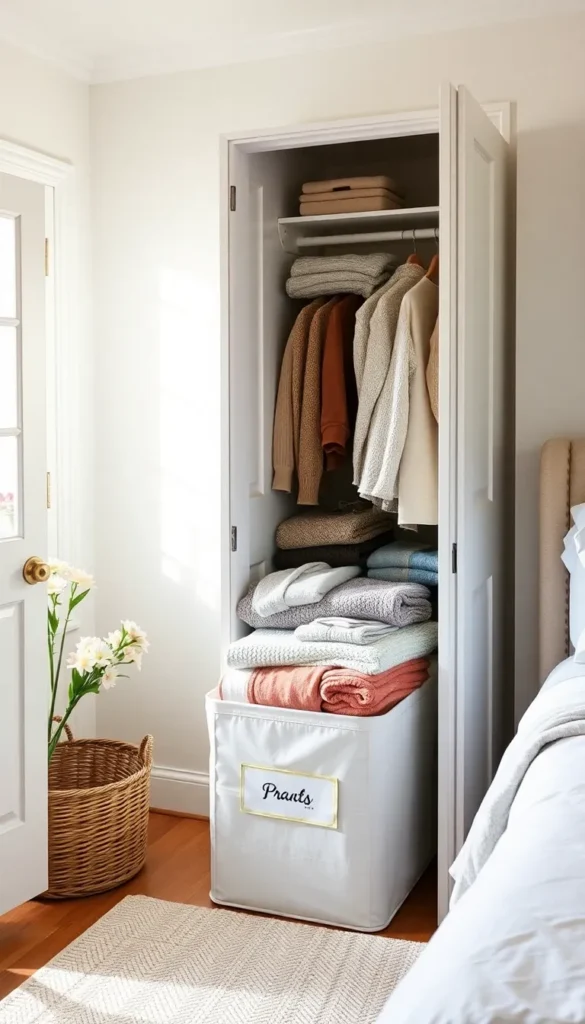
Step 4: Choose the Right Storage for Each Item
How you store winter clothing is just as important as where. The wrong containers can lead to moisture damage, crushing, or stretched-out shapes by next season.
For bulky knits and sweaters:
- Fold — never hang — to prevent stretching
- Store in breathable fabric bins, canvas boxes, or cedar-lined chests
- Add cedar blocks or lavender sachets to deter moths naturally
For coats and structured jackets:
- Store hanging in a garment bag in a secondary closet or wardrobe
- Use padded or wooden hangers to maintain shoulder shape
- Avoid plastic dry-cleaning bags for long-term storage — they trap moisture
For boots and cold-weather shoes:
- Clean and condition leather before storing
- Use boot shapers or stuff with acid-free tissue to hold their form
- Store in original boxes or clear shoe boxes with labels
For accessories (scarves, gloves, hats):
- Group together in a single labeled bin or basket
- Roll scarves rather than folding to prevent creasing
- Store gloves in pairs secured with a clip or rubber band
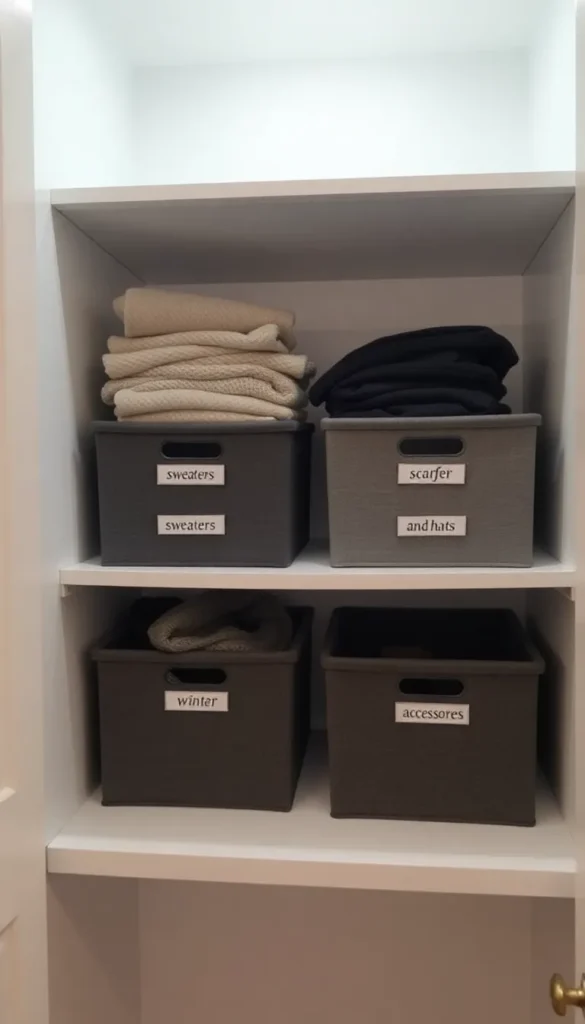
Step 5: Store Smartly Based on Your Space
Where your winter clothes live for the next six months depends entirely on your home — but the principle stays the same: cool, dry, and dark.
Great storage locations:
- Under the bed — use flat rolling bins or vacuum storage bags to maximize this often-wasted space
- High closet shelves — perfect for folded items in labeled bins
- A secondary wardrobe or armoire — ideal for hanging coats and jackets
- A hall closet — dedicate one section entirely to off-season clothes
Locations to avoid:
- Basements with moisture issues
- Attics with extreme temperature swings
- Anywhere with direct sunlight exposure

Step 6: Welcome Your Spring Wardrobe Properly
Once winter is packed away, don’t just shove spring clothes in haphazardly. This is your chance to reset your closet with intention.
- Hang spring and summer clothes with breathing room — overcrowding is what makes closets feel chaotic
- Organize by category and color for easy morning decisions
- Place the most-worn pieces at eye level and within easy reach
- Do a quick spring edit too — anything that didn’t fit or feel right last year doesn’t need to come back out
Seasonal Clarity Is Worth Every Minute
There’s something genuinely mood-lifting about a closet that reflects the season you’re actually in. The swap takes a few focused hours, but the payoff — a lighter, calmer, more functional wardrobe space — lasts for months.
Save this guide and schedule your seasonal swap for this weekend. Your spring self deserves a closet that feels as fresh as the season.